Welcome to

Hope this Werks

Fresh milled. Real Food. Pure energy.

The Best Beginner Fresh Milled Flour Bread Recipe

Updated: January 10, 2026

So you’re thinking about baking with fresh milled flour … maybe your grain mill is still in the box, or maybe you’re just looking for a quick, no-stress bread recipe that won’t end in a floury meltdown. Either way, you’re in the right place. This fresh milled flour bread recipe is your go-to loaf: soft, simple, and super reliable. No sourdough starter to feed, no complicated techniques, and no need to consult the ancient scrolls of bread science. Just a straightforward, satisfying recipe that lets you dip your toes into the world of fresh milled baking … and come out with a gorgeous loaf that’s perfect for sandwiches, toast, or just showing off on the kitchen counter.


If you’re new to milling your own flour (or just want a win in the bread department), start here. This loaf is here to build your confidence … and maybe even impress your family enough that they forget about that one time you tried to bake with chickpeas.

Fresh milled flour bread recipe with mill in background
Easy, fluffy fresh milled bread ... just right for sandwiches, toast, and showing off your milling skills.

Why This Fresh Milled Flour Bread Recipe is Perfect for Beginners

Let’s break it down like a middle school science fair chart (minus the glitter glue):

Feature Why It Matters
Uses 100% fresh milled flour Healthier, tastier, uses the whole grain!
Uses yeast … not sourdough Way easier and faster for beginners
Ready in just a few hours No 12-hour rise or overnight sourdough panic
Soft and sliceable Sandwich-worthy, toast-approved
Easy to double or triple Meal prep? Bake sale? You’re covered.
Family-approved Even picky eaters will ask for seconds

My Daughter Hit Pause on Sourdough … but Not Her Fresh Milled Flour Bread Recipe

Let me tell you about one of my daughters. She just had a new baby (insert proud grandma squeal here), and let’s be honest … her hands are currently full of baby snuggles, burp cloths, and possibly a cold cup of coffee. So for now, she’s pressing pause on sourdough and saying “yes please” to yeast.

Even though sourdough is taking a backseat, she didn’t want to give up fresh milled flour. Why? Because fresh milled flour only adds minutes onto her baking time, it tastes next level amazing, AND once you know how good it is for you (hello, bran, germ, and endosperm … all three parts of the wheat berry!), it’s hard to go back to store-bought flour that’s been stripped of most of its nutrients.  So if you’re after an easy, delicious, and healthy loaf of bread… this one’s your new bestie.

What’s Next?

We’re about to dive in … step-by-step … because I want this bread to be a win for you, not a “well, the chickens liked it” kind of project.

And yes, you can totally scale this up. My recipe card at the bottom is for one loaf, but I made you some FREE adorable recipe cards if you want to make 2 or 3 loaves (because fresh bread disappears fast … am I right?). The recipe cards are cute, they’re handy, the math is done, and you can snag them right here.

Step 1: Get Your Yeast Bubbly (Because This Fresh Milled Flour Bread Recipe Deserves a Rise and Shine)

Before we even think about flour, let’s give yeast the spotlight it deserves. After all, this fresh milled flour bread recipe isn’t going to rise on personality alone. First things first: let’s talk about what kind of yeast to use … and yes, it does matter (kind of, but also… not really).

Wait… What Kind of Yeast Do I Buy for My Fresh Milled Flour Bread Recipe?

Great question. Walk down the baking aisle, and you’ll find yourself staring at an entire yeast family reunion. The two main types you’ll find are:

And while they sound similar, these yeasts each bring something a little different to the bowl.

Yeast Showdown: Active Dry vs. Instant (Chart Time!)

Feature Active Dry Yeast Instant Yeast / Quick-Rise
Needs proofing? Traditionally, yes Nope, toss it right in
How fast does it rise? Slower, more gradual Fast … great for tight schedules
Flavor development? Slightly more, due to longer rise Milder flavor, but still delicious
Size of granules Larger Smaller = more surface area
Dissolves in dry mix? Yes (modern versions) Yes
Used for bread machines? Not ideal Preferred
Can be used interchangeably? Yes, just adjust rise time if needed Yes
Heat limit (important!) Dies above 139°F Also dies above 139°F

A Quick Yeast History (Because Fresh Milled Flour Bread Recipe Nerds Are the Best Kind of Nerds)

Back in the day, active dry yeast had to be proofed first … meaning you’d mix it with warm water (around 105°F–115°F) to wake it up from its cozy little slumber. This was mostly because it was processed a bit more… aggressively (think dehydrated with the care of a jet engine).

But now? Yeast has had a glow-up. These days, even active dry yeast is made more gently, so technically, you don’t have to proof it. You can throw it right in with the dry ingredients like instant yeast.

That said, if you’re like me and haven’t used your yeast since the last solar eclipse … it’s probably smart to give it a little test run before introducing it to your beautiful fresh milled flour.  I want to make sure it’s alive, happy, and ready to work. Especially since I usually bake sourdough (which is like raising a tiny wild pet). I like to be certain my yeast isn’t, well… dead.

So here’s what I do … proofing prep steps:

  1. In the bowl of my stand mixer, I combine:
    • 1½ cups warm water (105°F–115°F)
    • 2 tablespoons of honey (yeast’s favorite snack)
    • 1½ teaspoons of yeast
  2. Stir it up gently and wait 5–10 minutes.
  3. If it looks like creamy cappuccino foam … Congrats, you’ve got lively yeast!
  4. If it just sits there … sad and still … your yeast might be expired, and this loaf is going nowhere fast.

Just don’t forget the one golden rule … yeast doesn’t survive above 139°F. So don’t accidentally give it a sauna day. You want warm water, not “hot tub in Vegas.”

Once your yeast is bubbly and thriving, your fresh milled flour bread recipe is officially off to a great start!

Yeast, water and honey

Step 2: More Ingredients - Fresh Milled Flour Bread Recipe Just Got Saltier (and Oilier)

Alright, now that your yeast is bubbly like it just heard gossip, it’s time to move on to the next part of this fresh milled flour bread recipe adventure: adding the salt and olive oil. 

Now, let’s go ahead and add 1½ teaspoons of salt to your yeast mixture. 

Pro Tip:  Ever noticed that your measuring spoon set has a random “½ tablespoon” in it? You know, the one that’s not quite a teaspoon and definitely not a tablespoon? Well, guess what:  ½ tablespoon = 1½ teaspoons.  That’s right! It’s exactly what you need here. One spoon. No math. No clutter. Just grab that awkward little hero.

Now it’s time to add some oil … specifically, 2 tablespoons of olive oil. Could you use butter? Sure. Could you use coconut oil or avocado oil or whatever fancy drizzle you have in your pantry? Of course.  But me? I made a life decision a while back. A baking boundary, if you will.  If the recipe calls for fat in a bread dough, I’m always using olive oil. It’s dependable. It’s flavorful. (Yes, I refer to my bottle of olive oil as Oliver Oil, and yes, we are on a first-name basis.)

Why Add Fat at All to Your Fresh Milled Flour Bread Recipe?

Here’s a quick breakdown of what olive oil does:

  • Makes the crumb more tender and soft
  • Helps keep the bread fresher, longer
  • Adds subtle flavor that plays nice with whole grain
  • Makes you feel fancy even when baking in sweats

Once your oil and salt are stirred in, you’re almost ready to invite the star of the show to the bowl … your beautiful, fresh milled flour.

salt, olive oil, wheat berries and fresh milled flour

Step 3: Fresh Milled Flour Bread Recipe … It’s Wheat Berry Time, Baby

Now, cue the spotlight and dramatic music … because the fresh milled flour is finally making its grand entrance. This is the moment your fresh milled flour bread recipe has been waiting for, and honestly, it deserves a standing ovation.

We’re not using that sad, months-old bag of mystery flour from the back of your pantry. No ma’am. We’re grinding our wheat fresh like the grain-loving champions we are.

You’re going to need:

If you’re into kitchen math (or you just like using your food scale because it makes you feel like a baking scientist), here’s my rule of thumb:  1 cup of wheat berries ≈ 200 grams

So, 2½ cups? That gives you around 500g of freshly milled flour (it will weigh the same before and after you run it through the grain mill). Simple math, glorious results.

Which Wheat Berries to Use?

There are so many options, and while variety is beautiful, it can also be slightly paralyzing. So here’s my personal mix for this fresh milled flour bread recipe:

My Go-To Blend:

And if you’re wondering why I mix them … great question! Hard white gives a soft, neutral base, while hard red adds that hearty nutty flavor and that gorgeous warm color.

How to Pick the Right Wheat Berry

Type of Wheat Berry Use in Yeasted Recipes? Texture Flavor Notes Good For
Hard White ✅ Yes Medium Mild, versatile Sandwich bread, rolls, bagels, pizza
Hard Red ✅ Yes Hearty Robust, nutty Rustic loaves, dinner rolls, focaccia, soft pretzels
Soft White ❌ Not ideal Soft Delicate, mild Muffins, biscuits, cakes, waffles
Einkorn/Spelt/Kamut/Ancient Grains ⚠️ Sometimes Varied Nutty, ancient grain-y Cookies, pancakes, flatbreads, pasta

My Rule:
If your baked good has yeast, use hard wheat berries.
If it doesn’t? Go with soft wheat berries or an ancient grain.

Still unsure? No worries … I’ve got a whole article about how to choose the right wheat berry for every recipe. It’s beginner-friendly and even comes with a free printable chart (because I love a good freebie and I bet you do too).

Mix It Up (Literally)

Once your wheat berries are freshly milled and smelling like a golden field of dreams, it’s time to add that flour to your yeast mixture.

Here’s What to Do:

  1. Add your flour one cup at a time to the bowl.
  2. Stir between each addition.
  3. Keep going until you’ve got a shaggy dough … slightly messy, a little sticky, and fully alive.

If your dough looks like it just rolled out of bed and hasn’t had coffee yet, you’re doing it right.

Step 4: Knead and Rest - Fresh Milled Flour Bread Recipe Gets a Spa Day

At this point in your fresh milled flour bread recipe journey, you’ve got a shaggy little dough baby. It’s lumpy, sticky, maybe a little confused … but don’t worry. All it needs now is a bit of patience, some strong mixing action, and a well-deserved nap.

Knead #1: The First Stretch-and-Smoosh Session

As soon as your dough is formed (remember: shaggy is beautiful), you’ll want to knead it for 8 full minutes.

Why 8 minutes? Because fresh milled flour takes a little more convincing to develop gluten properly. It’s not as instantly obedient as store-bought flour … it’s got character, okay?

Pro Tip:  Keep the dough slightly on the wetter side. Fresh milled flour takes a bit longer to hydrate, so don’t mix in too much flour right now.  We are aiming for a sandwich loaf with a soft texture.

dough in ankarsrum mixer for fresh milled flour bread recipe

Let It Rest (Uncovered or Covered … You Decide)

After the initial kneading session, give your dough a well-deserved 30-minute rest. You can cover it with a damp towel, or you can rebel and leave it bare. I support your creative decisions.

This resting period is especially important for fresh milled flour, which hydrates more slowly than pre-ground store flour. During this time, your dough will:

  • Become less sticky
  • Absorb the moisture
  • Start to develop gluten strength
  • Possibly whisper, “thank you” (emotionally, if not audibly)

Knead #2: The Glow-Up Round

After that half-hour rest, it’s time to knead again … another 8 minutes. Why again, you ask?  Because this second kneading gives your dough the structure it needs to rise tall and proud in the loaf pan.

This is the moment where things start to come together … literally. Your dough becomes elastic, smooth, and ready to grow into the bread it was destined to be.

Adjust as Needed:  Dough too wet?  Add a sprinkle of flour.  Dough too dry?  Add a teaspoon or two of water, slowly.  Every kitchen is different, and every batch of wheat is a little unique.

Mixer Musings: A Love Letter to My Ankersrum

Let’s talk equipment. I use an Ankersrum stand mixer, and let me tell you … it’s an absolute beast when it comes to kneading bread dough. Like, it could probably out-lift your gym buddy.

I’ve personally killed two mixers in my baking journey (RIP, little motors). They were both KitchenAids (one was even the Professional 600).  Before you come for me, I did read the manual… I just didn’t let it stop me. KitchenAid says:

Don’t knead for longer than 2 minutes at speed 4.
Then you need to give the mixer a break before going again.

Let’s just say… I’m more of a “let the dough decide” kind of person. And my dough often decided that 2 minutes was not nearly enough.  That’s why I switched to the Ankersrum. It kneads for long sessions without overheating, stalling, or filing a formal complaint.

Kneading Methods Comparison Chart:

Kneading Tool Max Knead Time Best For Watchouts
By Hand 10–12 minutes Great upper body workout Takes practice, time-consuming
KitchenAid Mixer 2 min per session Cookies, muffins, goodies (bread can be tough on it) Can overheat or wear out the motor … it might throw a tantrum
Ankarsrum Mixer 10+ minutes Bread beasts Expensive, adjustment period to figure out how to use
Bread Machine Varies Set-it-and-forget-it convenience Less control, gluten’s like, “meh, I’ll show up if I feel like it”

Once your dough has finished this second kneading session, it’s strong, stretchy, and ready for its next big adventure.

Step 5: Shape That Dough - Fresh Milled Flour Bread Recipe Levels Up

It’s shaping time! You’ve kneaded, you’ve rested (well, your dough has), and now this squishy little blob is ready to graduate into an actual loaf. It’s not just a pile of promise anymore … it’s about to be bread. Beautiful, golden, sandwich-worthy bread.

When it comes time to work with dough, there are two kinds of bakers:

  1. Team Flour Sprinkle
  2. Team Oil + Water Slide

Both methods are valid. However, bread can get stiff if you add too much flour during shaping. That’s why I usually reach for the second option.

Here’s what to do:

  1. Lightly spritz your countertop with oil.
  2. Wet your hands with water.
  3. Plop your dough onto the counter.
  4. Gently flatten it into a rectangle-ish shape.
  5. Fold the sides inward (like you’re tucking in a cozy baby burrito).
  6. Roll it up tightly, starting from the short side.
  7. Pinch the seam and place it seam-side down into your loaf pan.

The goal is a tight, smooth surface that fits nicely into your loaf pan.

Let’s Talk Loaf Pans (and Memory Loss)

This fresh milled flour bread recipe is written for the classic: 1.5-quart glass loaf pan.

But not all pans … and not all doughs … are created equal. If your loaf ends up looking like it skipped leg day and doesn’t rise high enough to fill the pan, that’s okay! You’re just one batch away from greatness. Adjustments for next time … if youf loaf is too small:

  • Try increasing your water by ¼ cup next time
  • And of course, bump up the flour accordingly (keep that hydration ratio balanced!)
  • Warning:  You will forget what you changed unless you write it down. Trust me. I’ve promised myself “I’ll remember” too many times… and I’ve remembered exactly zero times.

No Need to Cover 

Here’s some good news:  You don’t need to cover your loaf during the second rise.  In fact, not covering it can actually help avoid tragic outcomes like:

  • Sticking to plastic wrap or a towel
  • Tearing the top of your loaf when you try to remove the cover
  • Deflating your beautifully risen dough 

Let your loaf rise freely … uncovered.  Once your dough is shaped and snuggled into the pan, it’s ready for its final rise.

fresh milled flour bread recipe in glass pan

Step 6: Proof & Preheat - Fresh Milled Flour Bread Recipe Gets its Final Rise

Okay, so your dough is shaped, snuggled into its pan, and probably feeling pretty proud of itself. Now it’s time to proof … which is a fancy bread word for “let it rise one more time before hitting the heat.”

In this stage of your fresh milled flour bread recipe, we’re mostly just waiting, but smartly. You don’t want to nap through this part … this is the final rise before the bake, and things can go sideways if you’re not paying attention.

How Long Does Proofing Take?

The short answer: it depends.
The long answer: it really depends.

There’s no perfect proofing time because your kitchen is its own unique microclimate. Humidity, temperature, altitude, planetary alignment … these things all seem to affect how fast your bread rises. (Okay, maybe not the last one.)

Typical Proofing Range:  30 to 60 minutes

So what do I do?

  1. I set a timer for 30 minutes
  2. I go check my loaf like it’s a sleeping toddler
  3. I repeat every 10–15 minutes until it looks juuust right

I’d rather check too often than miss my moment and end up with a doughy landslide.

What Does “Adequately Proofed” Look Like?

Here’s my secret:  If the dough crests just over the top of the loaf pan, it’s ready to go.  That’s the visual cue I wait for. Assuming your dough fits your pan (remember Step 5?), this is your green light.

Plus, don’t forget … you’ll get a little extra rise in the oven, known as “oven spring.” So if it’s just barely over the edge of the pan, you’re in perfect territory.

Preheat That Oven, Baby

Once your dough is nearly fully proofed, it’s time to crank up that oven. You don’t want your dough sitting there twiddling its gluten fingers while waiting for the heat to catch up.  I usually turn mine on when I see the loaf starting to crest over the top edge, which means baking time is just around the corner.

Preheat To:  350°F (177°C)

Proofing Factors That Affect Bread Timing:

Factor Effect on Rise Time Tip
Kitchen temperature Warmer = faster proofing Ideal: 75–80°F
Humidity Higher = softer dough Can help proof faster
Altitude Higher = faster rise May need shorter proof time
Dough hydration Wetter dough = slower proof Be patient, it’ll get there
Your actual loaf pan Smaller pan = faster rise Match dough size to pan carefully

Step 6 Recap Checklist

  • Let dough rise (30–60 min, check often)
  • Watch for dough to just crest over loaf pan
  • Preheat oven to 350°F
  • Do not overproof (no collapsing loaves today, thank you very much)

Once you’ve hit that perfect rise and your oven is toasty warm, you’re ready for the grand finale: baking your bread!

Fresh milled flour bread recipe rising in glass pan

Step 7: Bake It - Fresh Milled Flour Bread Recipe Hits the Heat

Alrighty, it’s go time. Your dough has risen, your oven is hot, and your kitchen smells like potential. Now it’s time to slide that beauty into the oven and transform this fresh milled flour bread recipe from doughy promise into a golden, glorious loaf.  Gently place your loaf in the oven … don’t slam the door like you’re mad at it. Treat your bread like it’s auditioning for The Great British Bake Off.

Let your bread bake for 30 minutes at 350°F. Now, I know you’re tempted to open the oven and peek every five minutes, but try to hold back. Let the heat do its thing.  I’ve been told that every time you open the oven you lose 50 degrees of heat (I haven’t tested this … but it makes sense to me).

That said, if you’re stressing about whether your loaf is actually done … you’ve got options. Stick a thermometer in the center; if it reads 190°F, you’re golden (literally). Or, go by the vibe: if your house smells like a bakery, it’s been about 30 minutes, and the crust looks beautifully golden? It’s done. That’s my go-to method … the “trust your nose and eyeballs” approach.

Pro Trick: Baking Multiple Loaves?

If you’re like me and believe in baking once but eating well for days (or sharing with friends and pretending you’re a homestead fairy) … you might be making 2 or 3 loaves at a time.

Here’s a simple trick to help them rise tall and proud:  Place the loaf pans so they’re touching.  Why? Because when the loaves are close together, they support each other during baking. This encourages them to rise up instead of spilling over the sides and forming that tragic bread waterfall around your pan.

Click here for the cutest little recipe cards ever for baking multiple loaves … whether you’re baking 2 loaves or 3 (one to eat, one to share, one to hoard in your freezer). I did all the math so you don’t have to. You’re welcome.

Step 8: Cool, Then Enjoy - Fresh Milled Flour Bread Recipe Victory Lap

Congratulations … you made it to the final (and most torturous) step of this fresh milled flour bread recipe.  Your kitchen smells like a dream. The loaf looks like a magazine cover. Your family is circling the kitchen like little sharks. But before you grab a knife and start slicing … you’ve got one more challenge: the Cool Down.  

To finish your fresh milled flour bread recipe like the bread champion you are:

  1. Remove the loaf from the pan right away
    → This prevents a soggy bottom (which is only cute on babies).
  2. Place it on a wire rack
    → Allows air to circulate underneath. No sweating, no sad crusts.
  3. Wait at least 1 hour before slicing
    → Ideally 90 minutes. But I’m not your boss. Just know it’s worth it.

Fun Fact:  Bread keeps cooking even after it’s out of the oven.  It’s not just sitting there looking pretty (although it is doing that, too).  So, give it the time it deserves.

Final Thoughts: You Did It! Fresh Milled Flour Bread Recipe Wrap-Up

If you made it all the way through this fresh milled flour bread recipe, you deserve a standing ovation (and probably another slice). Whether you’re new to baking with fresh milled flour or you’ve already converted your pantry into a wheat berry storage unit, this recipe is the perfect launchpad into the world of soft, sandwich-worthy homemade loaves. You’ve kneaded, shaped, proofed, and baked like a total grain boss. And now, you’ve got a gorgeous loaf of bread to show for it … one that’s not just delicious, but packed with all the benefits of whole grain goodness.

Be sure to check out my other recipes, tutorials, and guides to keep your fresh milled flour baking journey going strong. There’s a whole world of floury fun waiting for you.

And hey, if you made this bread and loved it … leave a comment below or share a picture on Instagram @hopethiswerksdiy! I promise to cheer wildly from the sidelines.

Here’s a link to the recipe cards for making 2 loaves or 3 loaves. Right this way … click here to download those beauties and get bakin’!

And if you want to make sure you never miss a fun, new post (and who wouldn’t want to?), subscribe right here. As a thank-you, I’ll send you a FREE gorgeous recipe card for the best pancakes on earth. Trust me, you’ll want them in your life.

Until Next Loaf…

Keep milling, keep baking, and keep enjoying every slice.

fresh milled flour bread recipe on counter with mill in background
Freshly baked loaf of bread made with fresh milled flour ... perfect for sandwiches, toast, or sharing. Just 6 simple ingredients!
Yield: 1 loaf

Fresh Milled Flour Yeast Bread

Fresh milled flour bread recipe with mill in background

Easy, fluffy bread made with just 6 simple ingredients. Perfect for sandwiches or toast. One loaf, no stress, all the fresh milled goodness.

Ingredients

  • 1½ cups warm water (360g) - think cozy bath, not scalding shower
  • 1½ tsp yeast - active dry or instant, whichever you've got
  • 2 tbsp honey
  • 1½ tsp salt
  • 1½ tbsp olive oil
  • 2½ cups wheat berries (500g) - Suggestion: go halfsies! use 1½ cups of hard white (300g) & 1 cup hard red (200g)

Instructions

  1. Wake up the yeast: In your stand mixer bowl, mix together 1½ cups warm water, 1½ tsp yeast, 2 tbsp honey. Let it sit for a few minutes until it's looking foamy and happy ... like a latte made of yeast.
  2. Add some flavor: Stir in 1½ tsp salt, 1½ tbsp olive oil.
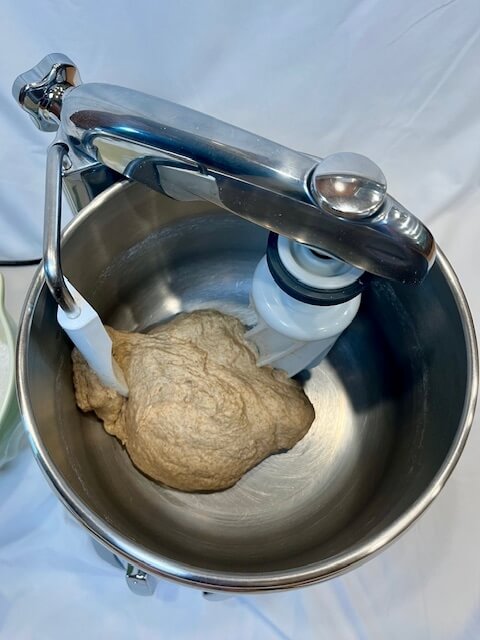
  3. Get your grain on: Finely grind 2½ cups (500g) of wheat berries. Add the flour to the bowl, one cup at a time, until it turns into a shaggy mess. Shaggy is good.
  4. Knead it: Knead for 8 minutes (yes, the mixer can do this part). Keep the dough on the wetter side (fresh milled flour is a slow hydrator). Now let it take a nap for 30 minutes. Then knead again for 8 more minutes ... because we are building structure here. If it's feeling too sticky or dry ... go ahead and adjust the flour or water now.
  5. Shape and pan it: Form your dough into a loaf. Spray your loaf pan. Plop that beautiful dough in.
  6. Proof it: Preheat oven to 350°F. Let the loaf rise (no need to cover it) for 30-60 minutes, or until it's peeking over the edge of the pan like it's nosy.
  7. Bake it: Bake at 350°F for 30 minutes until golden and fragrant. The smell will make you question why you ever bought store-bought bread.
  8. Cool your jets: Let it cool on a wire rack. Don't slice it hot ... it's still finishing up its business in there. Then? Slice. Slather. Savor. Brag a little.

Notes

  1. Pan size matters. This recipe is made for a 1.5-quart loaf pan. If your pan is bigger or smaller, you might need to tweak the amounts a bit.
  2. Want to bake double or triple batches? I’ve got you ... click here for the recipe cards that do the math for you.
  3. Is it done yet? Bread is usually ready when the internal temp hits 190°F.
  4. Not sure which wheat berry to use? No worries ... check out this article to help you pick the best one for your baking adventures.
  5. Can I freeze it? Yep! Just let it cool completely, then wrap it up tight and freeze. It’ll be happy in the freezer for months.
  6. How long does it last on the counter? About a week ... if you don’t eat it all before then. Store it in a bag or container to keep it soft and fresh.

Recommended Products

As an Amazon Associate and member of other affiliate programs, I earn from qualifying purchases.

Resource:

https://www.kingarthurbaking.com/learn/resources/yeast

portions of this content may have been generated or refined using AI assistance

Share the Post:

13 responses to “The Best Beginner Fresh Milled Flour Bread Recipe”

  1. Hi! This is kind of off topic but I need some advice from an established blog. Is it tough to set up your own blog? I’m not very techincal but I can figure things out pretty quick. I’m thinking about setting up my own but I’m not sure where to start. Do you have any tips or suggestions? Cheers

  2. Made this yesterday, and ooh-wee, it’s scrumptious! Thank you for the simple instructions. (I added 10 extra minutes to the baking time, until the internal temp reached 190 degrees F.)

  3. I’ve tried several different recipes for sandwich since I started with fmf and this so far has turned out the best.
    My husband said it was very good 😊

  4. Thanks for always putting out tried and true recipes that are easy to follow! I love this not being a sourdough recipe…as much as I love sourdough sometimes I don’t have time for that!

  5. Love the smells and fresh taste of home cooking.
    …….but nothing beats warm bread with (lots) of butter.
    Thank you for the recipe. I learned something about yeast too!

  6. I couldn’t believe this was made with fresh milled flour. Taste is amazing. So soft and easy to make. Definitely making it again.

Leave a Reply

Your email address will not be published. Required fields are marked *

Skip to Recipe