


Sourdough Sandwich Bread
A delicious sourdough sandwich bread ... perfect for PB&J, cold cut sandwiches, runny egg-on-toast mornings, grilled cheese o’clock ... plus, it's freezer-friendly.
Ingredients
Levain (night before)
- 200 grams (1 cup) room-temp water
- 200 grams (1½ cups) flour
- 100 grams (½ cup) sourdough starter
Dough
- 2 ⅓ cups (550g) water
- ¼ cup (85g) honey
- 1 tablespoon (18 g) salt
- 2 tablespoons olive oil
- ¼ cup (17g) dried potato flakes, optional
- 7 cups bread flour (using fresh milled flour? check out the other recipe card)
Instructions
1. Mix levain the night before (or use 1 cup of cold sourdough starter in the morning).
- 200 grams (1 cup) water, 200 grams (1½ cups) flour, 100 grams (½ cup) sourdough starter
2. Add all ingredients, except flour, to the levain.
- 2⅓ cups (550g) water, ¼ cup (85g) honey, 1 Tbsp salt, 2 Tbsp olive oil, ¼ cup (17g) dried potato flakes
3. Gradually mix in flour until the dough pulls from the sides of the bowl.
- 7-ish cups bread flour
4. Knead the dough for 5-8 minutes, adjusting flour if needed.
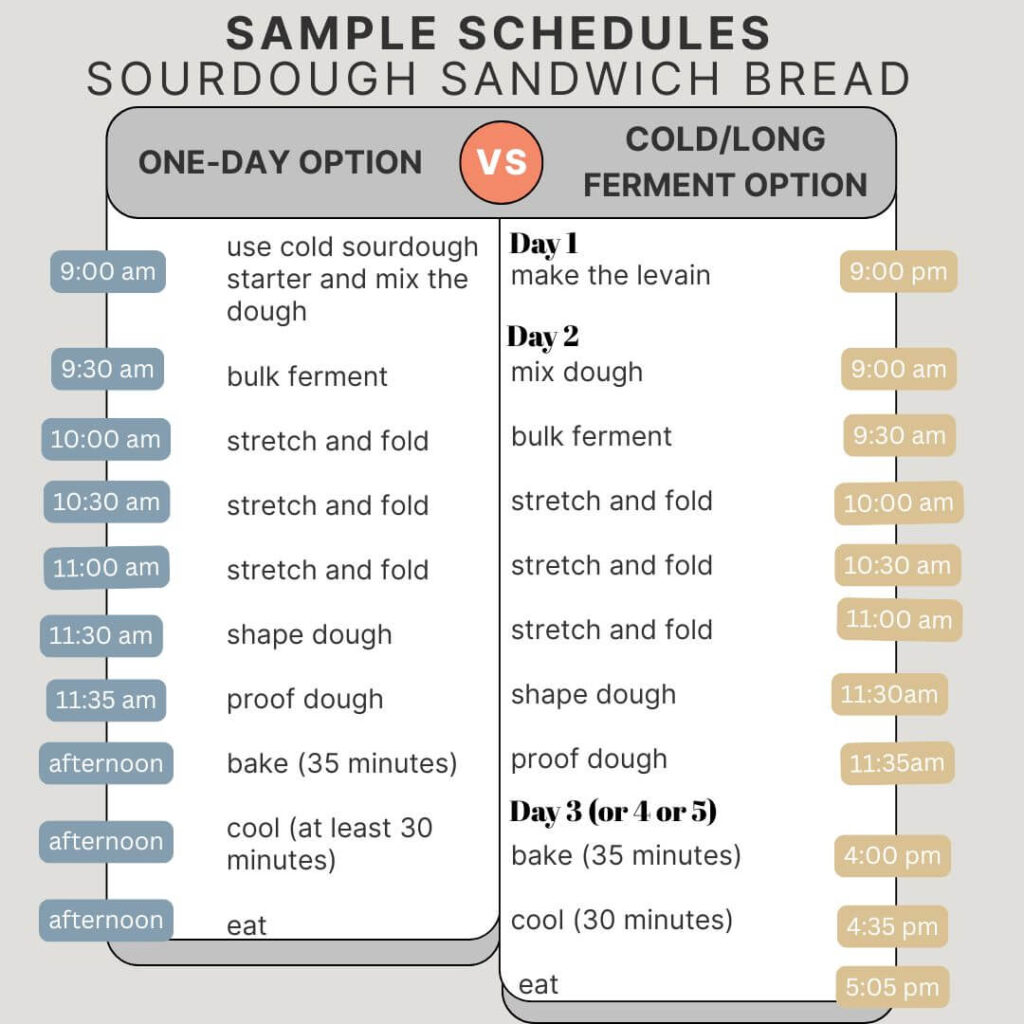
5. Bulk Ferment: Cover dough. Wait 15-30 minutes. Do a set of stretch and folds. Do 2-6 more stretch and folds about 30 minutes apart ... when you pass the windowpane test you are done.
6. Shape into 2 loaves. Tuck into greased 1.5-quart loaf pans. Cover. Proof until peeking above the rim of the pan. Optional: refrigerate the dough for 1-3 days for a longer fermentation.
7. Preheat oven to 350°F. Bake for 35 minutes until golden. Cool in pan for 5 minutes. Transfer to cooling rack.
Notes
Freezes well.
Shares well.
Recommended Products
As an Amazon Associate and member of other affiliate programs, I earn from qualifying purchases.

Sourdough Sandwich Bread (w/ Fresh Milled Flour)
A delicious sourdough sandwich bread ... perfect for PB&J, cold cut sandwiches, runny egg-on-toast mornings, grilled cheese o’clock ... plus, it's freezer-friendly.
Ingredients
Levain (night before)
- 200 grams (1 cup) water
- 200 grams (1½ cups) flour
- 100 grams (½ cup) sourdough starter
Dough
- 2 ⅓ cups (550g) water
- ¼ cup (85g) honey
- 1 tablespoon (18 g) salt
- 2 tablespoons olive oil
- ¼ cup (17g) dried potato flakes, optional
- 4½ cups (900g) wheat berries ... hard white and/or hard red (or any you prefer) ... ground to flour
Instructions
1. Mix levain the night before (or use 1 cup of cold sourdough starter in the morning).
- 200 grams (1 cup) water, 200 grams (1½ cups) flour, 100 grams (½ cup) sourdough starter
2. Add all ingredients, except flour, to the levain.
- 2⅓ cups (550g) water, ¼ cup (85g) honey, 1 Tbsp salt, 2 Tbsp olive oil, ¼ cup (17g) dried potato flakes
3. Mix in 5 cups of your freshly milled flour. Knead for 8 minutes. Let the dough rest for 30 minutes to hydrate. (If you have any extra ground flour ... pop it in the freezer.)
4. Gradually add more flour (keep the dough a tad wetter because fresh milled flour will continue to absorb moisture). Knead the dough again for 5-8 minutes, adjusting flour if needed.
5. Bulk Ferment: Cover dough. Wait 15-30 minutes. Do a set of stretch and folds. Do 2-6 more stretch and folds about 30 minutes apart ... when you pass the windowpane test you are done.
6. Shape into 2 loaves. Tuck into greased 1.5-quart loaf pans. Cover. Proof until peeking above the rim of the pan. Optional: refrigerate the dough for 1-3 days for a longer fermentation.
7. Preheat oven to 350°F. Bake for 35 minutes until golden. Cool in pan for 5 minutes. Transfer to cooling rack.
Notes
Freezes well.
Shares well.
Recommended Products
As an Amazon Associate and member of other affiliate programs, I earn from qualifying purchases.


7 responses to “Sourdough Sandwich Bread (options: fresh milled flour or store flour)”
I chose the refrigerator method because I had bread already and I wasn’t quite ready. I pulled it out and divided it in half, putting the other half back in the fridge. Am I now waiting for the dough to rise again – I should have asked yesterday – in the pan before the bake?
I’m not sure I completely understand your setup, but maybe this will help! 😊 I usually shape the loaves and put them right into the pans. From there, you can either let them start rising on the counter or put them directly into the fridge. It really depends on how active your sourdough is and when you want to bake them.
I have used this recipe twice now without fail! Even when I failed to perfectly follow the recipe my bread turned out great and this was super easy to follow! Thank you!
Way to go!!! This recipe is apparently immune to kitchen chaos … my kind of bread. Thanks for sharing!
Delicious, simply delicious! Keep the recipes coming!
I have made this multiple times. It is my new favorite bread recipe. We always have a loaf on the counter for sandwiches. We think it is perfect!
Thanks for the awesome comment! I’m so glad it’s your new favorite – it’s definitely a loaf that means business when it comes to sandwiches!