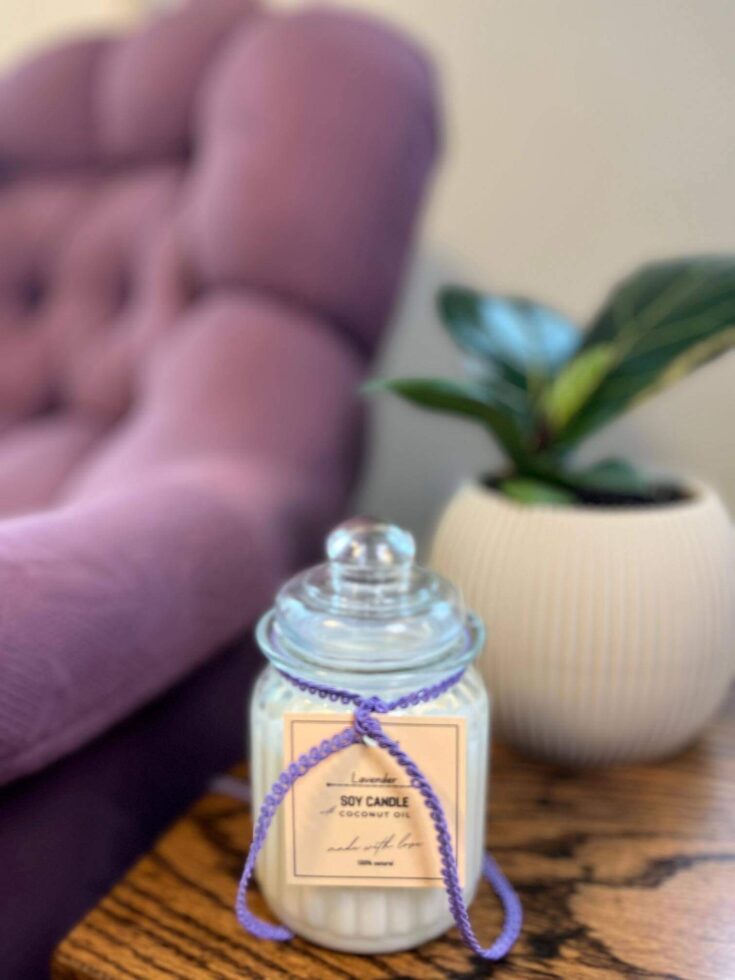
So, my daughter and her family were staying with us while their floors at their house were getting redone (which makes cooking way more fun … because food tastes better when you share it with your favorite people.) One morning, she was sipping her coffee and says, “So … I’ve been wanting to make scented homemade candles … how do you make them?”
Naturally, I lit a candle and launched into a full TED Talk. (You know … as one does.)
My daughter has been on a mission to switch to healthier, more natural products … so DIY candles made from soy wax and essential oils were right up her alley. And honestly? Candle making sounds fancy, but it’s surprisingly simple and seriously satisfying.
Homemade Candles Recipe: Step-by-Step
Making homemade candles isn’t just a craft … it’s a whole vibe. This is your official excuse to slow down, make something beautiful, and feel like a domestic wizard. Whether you’re going full granola or just want your house to smell like a luxury spa, this post will walk you through how to make candles step-by-step (with minimal mess and maximum good smells). We’ll cover everything from melting the soy wax to choosing your essential oils, plus how to make your homemade candles look so cute you’ll almost not want to burn them.
Bonus: there’s a free label you can print and stick on your jar so it looks like you bought it at a boutique … without the hefty price tag. Click here.
So grab your coffee and your “I’m crafting today” attitude. It’s time to DIY.
Materials Needed for Making Homemade Candles
Before we dive into candle making, you’ll need to gather your materials. Unless you’re the type of person who just has candle wicks lying around (teach me your ways), you’ll probably need to order a few things.
Here’s what you’ll need to make DIY candles at home:
- Soy Wax Flakes – the base of your candle; burns clean and slow
- Coconut Oil – helps the wax melt smoothly and evenly
- Essential Oils – for natural, scented candle vibes
- Fragrance Oil (optional) – for stronger smell-good power
- Cute Jars – because aesthetics matter
- Candle Wicks – kind of essential unless you like wax blobs
- Tape, Wick Holder, or Clothespin – to keep the wick from doing cartwheels
- Adorable Label – for that boutique look (FREE candle label alert! Click here.)
Once your orders have arrived and you’ve opened everything … it’s go time!
Tools Needed for Making Homemade Candles
You probably already have most of the tools in your kitchen. If not, it’s a good excuse to finally buy that $5 thermometer you’ll use twice a year.
Here’s what you’ll need to make homemade candles like a pro:
- Crock Pot – your wax-melting sidekick
- Crock Pot Liner – because scrubbing dried wax is not a hobby
- Glue Gun – to secure your wick
- Pouring Pitcher – for mess-free candle pouring
- Thermometer – so your wax is warm, not scorching (I love this thermometer … just sayin’)
- Kitchen Scale – for proper ratios and mad scientist vibes
- Popsicle Stick or Straw – for stirring without ruining your good silverware
Pro Tip: Before you get started, double-check that all your supplies are actually where you think they are. There’s nothing worse than chasing down a rogue thermometer that someone “borrowed.”
Melt the Wax
First things first: candle making is more fun when the vibe is right. So turn on your favorite playlist, and pour yourself a cozy drink. You’re about to enter your DIY candle era.
Now, line your crock pot with a liner. Yes, technically you can scrub wax out of a crock pot, but unless you enjoy scraping dried soy wax with your fingernails for sport … go ahead and use a liner. Treat yourself.
Set your crock pot to high. Dump in:
- 4 cups soy wax flakes
- 1 cup coconut oil
Let this melt for about an hour … give or take. When it’s all silky smooth and melted down, turn off the crock pot and let it cool to around 130°F-ish.
Why Use Soy Wax Instead of Paraffin for Homemade Candles?
Great question! Soy wax is kind of the VIP of natural candle making:
- Burns cleaner (less soot, fewer toxins)
- Made from soybeans = renewable and plant-based
- Longer burn time = more bang for your buck
- Better for people with allergies or asthma
- No weird petroleum chemicals (looking at you, paraffin)
Basically, soy candles are a little more wholesome, a little more eco-friendly, and a lot more burn-worthy.
What Kind of Coconut Oil Should I Use?
Ah, yes … the great coconut oil debate: refined vs. unrefined.
Here’s the quick and not-boring breakdown:
- Refined coconut oil = no scent, no coconut flavor, more processed
- Unrefined coconut oil = smells faintly like a beach day, less processed, a bit more natural (oil is from the first press of fresh raw coconut)
If you don’t want your lavender candle to smell like piña coladas, go with refined. If you’re okay with a hint of tropical, unrefined works great and keeps things a bit more “crunchy chic.”
Prep Those Cute Jars for Your Homemade Candles
While your soy wax is cooling down a bit, go ahead and channel your inner Martha Stewart. (But, like, the chill version who wears leggings.)
Grab your jars … mason jars, thrifted mugs, or anything heat-safe and adorable. Maybe you even have jars leftover from your last DIY adventure … like making your own tallow balm (which, by the way, you can totally learn how to do right here). This is your chance to make your DIY candles look boutique-level cute.
- Hot glue the wick to the center of the jar. Try your best to land it in the middle … close enough is totally fine. (It’s not heart surgery. It’s homemade candle making.)
- Use a wick holder, clothespin, chopstick, or a strip of tape stretched across the top to keep the wick standing tall and centered. If it flops over, it’s going to be a weird burn … and not in a cool, artsy way.
Pour the Wax
Once your wax mixture has cooled to about 130°F, it’s go time. Here’s how to pour without creating a wax crime scene in your kitchen:
- Carefully transfer the melted wax into a heat-safe pouring pitcher. If you scored one recently from Goodwill … kudos to you.
No pitcher? You can:- Totally grab a new one
- Dip a measuring cup into the crock pot liner (messy but doable)
- Or try pouring straight from the liner (a little chaotic, but it builds character)
- Place your cute jar on a kitchen scale. Hit that tare button so the scale resets to zero with the jar on it.
- Slowly pour the wax into the jar, leaving some room at the top. You’ll need space for the essential oils, optional fragrance oil, and a quick stir.
Fragrance Oil (Totally Optional)
So, here’s the deal: fragrance oil is optional. If you want your entire living room to smell like a coffee shop or a woodland cabin … fragrance oil is your bestie.
But if you’re aiming for natural candles, you can skip this step and go straight to essential oils. Just know your scented candle will have a much softer, more subtle vibe … like a whisper instead of a shout.
How much fragrance oil per 8 oz candle?
- 1 oz of fragrance oil per 8 oz candle is a great place to start (check out the chart below for other candle sizes and measurements)
- Pour it directly into the melted wax in the cute jar
Need ideas? I got you. These fragrance oils smell chef’s kiss:
- Leather, Teakwood, Cedar – for people who read Hemingway and own plaid
- Apple Cider, Gingerbread, Cinnamon – fall in a jar
- Ocean, Campfire, Rain – outdoorsy vibes without the bug bites
- Primrose, Violet, Azalea – bouquet for the nose
- Evergreen, Cedar – Christmas cheer
- Lavender, Rosemary, Sweet Pea – plant lady-approved
- Vanilla, Mocha, Chai – your favorite coffee shop
Essential Oil - Homemade Candles
Now for the natural magic. Essential oils are the go-to for making natural soy candles that smell beautiful.
How much essential oil per 8 oz candle?
- If using fragrance oil: add 12–18 drops of essential oil per 8 oz candle
- If not using fragrance oil: go with 20–25 drops per 8 oz candle for a stronger scent
- Drop the essential oils straight into the wax-filled jar.
Looking for a signature scent? These essential oils are timeless for a reason:
- Lavender – My all-time favorite. Calming, floral, never fails.
- Geranium – Super fragrant and a little fancy.
- Eucalyptus – Clean, spa-like, fresh as a eucalyptus-scented daisy.
- Chamomile – Gentle and soothing (aka bedtime in a jar).
- Grapefruit – Bright, citrusy, and summery.
Feeling creative? Mix and match these oils for your own custom DIY candle blend:
- Lemongrass + Eucalyptus – Smells like “I deep-cleaned my house” energy.
- Bergamot + Lavender + Geranium – Total flower power.
- Fir + Orange + Cinnamon – Christmas morning in candle form.
- Peppermint + Cedarwood – Candy cane meets cozy cabin.
- Lemon + Tea Tree + Lime – Like summer air with a squeaky clean twist.
- Rosemary + Lavender – Smells like your herb garden got its life together.
- Frankincense + Pine – Woodsy, grounding, and slightly mysterious.
- Orange + Cinnamon + Clove – Smells like fall decided to hug your nose.
- Clove + Cedarwood + Orange – Basically a crunchy leaf in candle form.
Note: I tend to look to Plant Therapy for high-quality, trustworthy oils.
Stir It Up
Now, give your homemade candle a gentle stir. (No whisking like you’re making pancake batter. Although if you want the best pancakes in the universe… click here. It’s my mom’s secret recipe, and yes … it’s life-changing.)
To stir use:
- A popsicle stick
- A chopstick
- A random straw
- Anything you’re okay sacrificing to the candle-making cause
This helps the scented oils evenly distribute into the wax, which is kind of the whole point, right?
Label the Cute Jar - Homemade Candles
Here’s a universal truth: you will forget what scent you made. You’ll swear you’ll remember that the blue jar is lavender and the mug is cedarwood, but your brain will betray you in approximately 39 hours. I always keep a roll of masking tape in my kitchen … I use it to label everything.
If you prefer a FREE vibing homemade candle label … you will find one right here. Use this label as a sticker or punch a hole in it and tie it on with twine for that rustic, Pinterest-perfect flair. It comes in three different sizes … so it will be perfect for any size container.
Let It Chill (literally)
You’ve worked hard, so now it’s time to chill … and let your candles chill too (not in a ‘brrr’ kind of way, more like a ‘put your feet up’ kind of way).
Find a quiet, undisturbed spot for your homemade candles to cure for 48 hours. This gives the wax time to harden, the oils time to fully blend, and the coziness time to settle in.
Just make sure:
- No kids bumping into them
- No cats knocking them off the table
- No temptation to light them early (I know it’s hard)
Trim That Wick
You’re almost at the finish line!
Before lighting your DIY candle for the first time:
- Trim the wick to ¼ inch
- This helps it burn clean, slow, and without a giant, scary flame
Also, let your candle burn long enough the first time to create a full wax pool across the top. This ensures even burning every time after … no weird wax cliffs.
Is it cheaper to make homemade candles?
Oh yes. Let’s break it down:
- $2.07 per candle for wax
- $0.88 per candle for coconut oil
- $0.76 per candle for essential oil
- $0.05 per candle for the wick
- $3.76 per candle (without fragrance oil & upcycling a jar)
Compare that to:
- $7.00 – a cheap candle from one of those huge stores
- $35.00 – a boutique candle
- $82.00 – an artisan candle … Made with coconut oil? Yes. Made with soy? Yes. In a cute mug that you get to keep? Yes. Sticker shock? Yes.
Bottom line: You can make 22 homemade candles for the price of one fancy artisan candle. Yikes!
Wrap-Up: Homemade Candles for the Win
Light up your life … literally … with your first batch of DIY scented soy candles! Grab your essential oils, fire up that crockpot, and turn your kitchen into a candle-making wonderland.
Making your own scented soy candles is easier than you think, cheaper than store-bought, and 1000% more satisfying. You know what’s in them (no weird toxins), you can customize the scent, and you can make them as cute or cottagecore as your heart desires. Plus, they make dreamy gifts, look adorbs on your counter, and let’s be honest … your house is about to smell like a spa/farmhouse/forest/coffee shop … whatever your heart desires.
Don’t forget to download your free printable candle label … because homemade candles deserve to be cute.
Subscribe to the blog so you never miss a fun, cozy, slightly chaotic project. Whether it’s candle making, sourdough bread, how to make flour at home, or other “I can totally make that” moments … I’ve got you covered. Join the fun and subscribe here!
Homemade Candles
Ready to dive into candle making without lighting your kitchen on fire? Learn how to make candles at home with soy wax, essential oils, and cute jars ... plus, free labels included! Your house will smell like a fancy boutique, and your gift game just leveled up.
Materials
- Soy Wax
- Coconut Oil
- Essential Oils
- Fragrance Oil
- Cute Jar(s)
- Candle Wicks
- Wick Holder, Masking Tape, Clothespin, or Chopstick
- Adorable Label
Tools
- Crock Pot
- Crock Pot Liner
- Glue Gun
- Pouring Pitcher / Measuring Cup
- Thermometer
- Kitchen Scale
- Popsicle Stick / Straw
Instructions
- Melt the Wax. Line your crock pot with a crock pot liner (unless you love scrubbing wax forever). Turn it on high. Toss in 4 cups of soy wax and 1 cup of coconut oil. Let it melt ... this takes about an hour. Once it’s all melted, turn off the heat and let it cool to about 130°F-ish (warm but not lava).
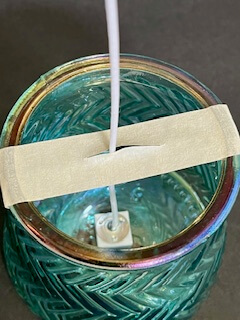
- Prep Those Cute Jars. Hot glue your wicks to the bottom of your cute jars ... centered is the goal. Use tape, chopsticks, or a fancy wick holder to keep the wick standing upright like a little soldier.
- Pour the Wax. Once your wax has cooled to around 130°F, pour it into a heat-safe pitcher or measuring cup. Set your cute jar on a kitchen scale and hit that tare button (so it reads zero with the jar on it). Pour the melted wax mixture into your jar ... slow and steady!
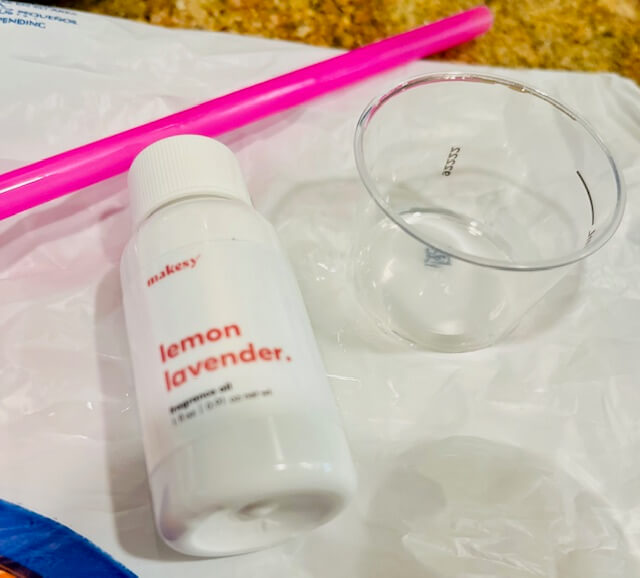
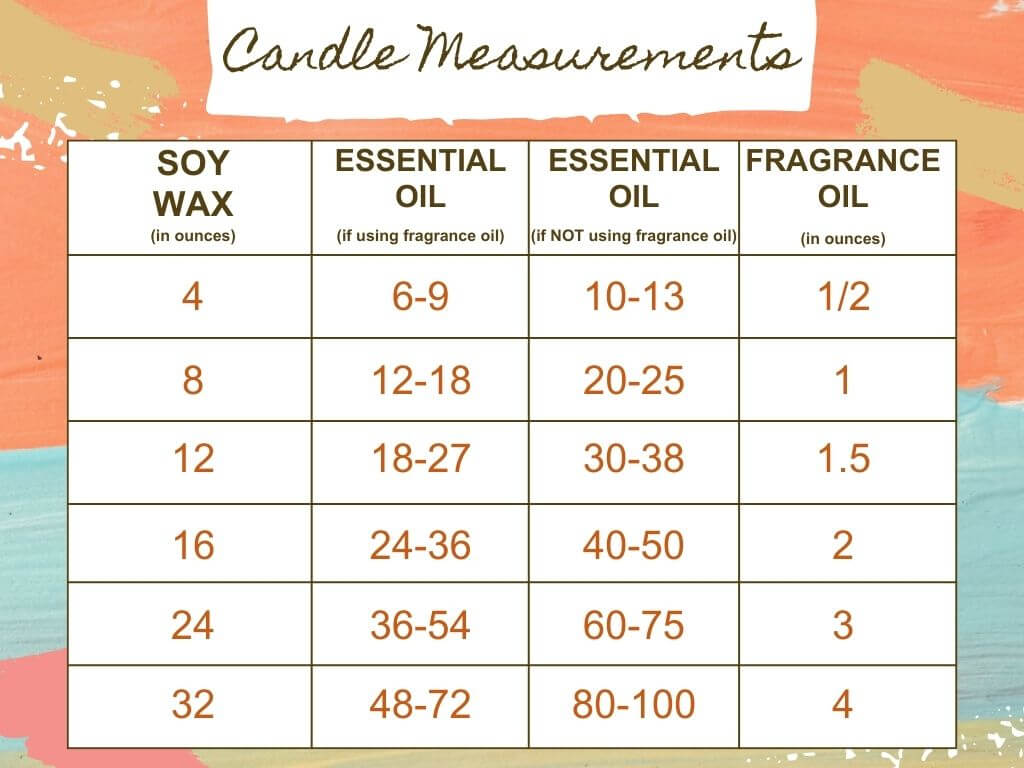
- Fragrance Oil. Add the fragrance oil directly into the wax mixture in your cute jar. How much? For every 8 oz. of wax ... add 1 oz. of fragrance oil (there is a chart in the blog to help with this). Want a "cleaner" candle without synthetic stuff? Skip the fragrance oil and go full-on crunchy with essential oils instead (skip to step 5). (Fragrance Oil Suggestions: Cinnamon - Gingerbread - Apple Cider, Primrose - Violet - Azalea, Evergreen - Cedar, Lavender - Rosemary, Leather - Teakwood - Cedar, Vanilla - Chai - Mocha)
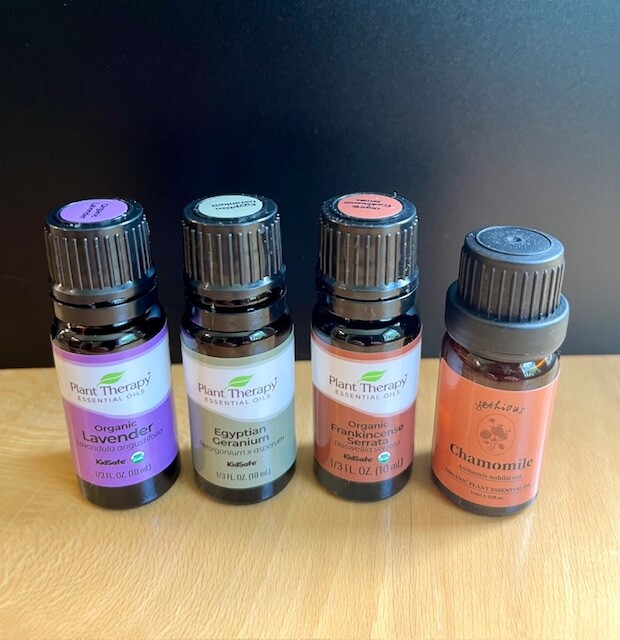
- Essential Oils. Add essential oils directly into your cute jar. How much? For every 8 oz. of wax ... add 12-18 drops of essential oil. If you skip the fragrance oil, then add 20-25 drops of essential oil. (Essential Oil Faves: lavender, chamomile, cedarwood, lemon, orange, grapefruit, eucalyptus, geranium, patchouli).
- Stir It Up. Give everything a gentle stir with a popsicle stick, straw, or whatever you have on hand (except not a spoon you love... wax is clingy).
- Label That Beauty. Put a cute label on it. Trust me ... you won’t remember if it’s “Lemon Bliss” or “Eucalyptus Explosion” in two days. FREE Label = click for instant charm for your candle.
- Let It Chill. Place your candles somewhere safe ... no bumping, no curious cats. Let them cure for 48 hours so the scent sets and the wax hardens up like a champ.
- Trim Before You Burn. Before lighting, trim that wick to about ¼ inch ... it helps the candle burn clean and even. Now light it, sit back, and admire your handcrafted, good-smelling masterpiece.
Notes
Quantity: 4 cups of soy wax and 1 cup of coconut oil will give you about three smaller candles ... think jars around 3" wide and 4" tall.
Wick Wisdom:
- If your jar is wider than 4 inches, you’ll want to use two wicks. Trust me ... no one likes a candle that tunnels down the middle like it's digging for treasure.
- Let your candle burn long enough the first time to create a full wax pool across the top. This ensures even burning every time after … no weird wax cliffs.
Reusing Old Candles: Got an old candle jar with sad leftover wax? Pop the whole thing in the freezer for a couple of hours. Once it’s nice and cold, the leftover wax should pop right out like magic. Candle recycling = good for your wallet and the planet.
some sentences or ideas may be from chatgpt or other AI


3 responses to “Easy Homemade Candles – Scented with Essential Oils”
I love how you made a “recipe card” here it makes it so simple and easy to follow! I will be using this to make candles in the future! Thanks!
This was such a fun Saturday afternoon with my friends. We all loved our candles. Thanks so much!
How fun! I’m so glad y’all had a good time … nothing like a little wax and wick to bring out everyone’s inner candle master.