
You’ve got recipes. Lots of them. Maybe they’re scribbled on old index cards, tucked into cookbooks, or stored in that “Recipes” folder on your phone you never organize. Some might be treasured heirlooms passed down from Grandma … and others might be your own creations, you swear no one else has nailed quite like you. Now you’ve bought a grain mill. You love it. You’ve bragged about it. But deep down, you’re wondering: How do I convert a recipe to freshly milled flour without it turning into a baking disaster?

Good news: not only can you convert a recipe to freshly milled flour … you can do it for every recipe in your collection. And you might as well, because that grain mill isn’t going to pay for itself by sitting in the pantry.
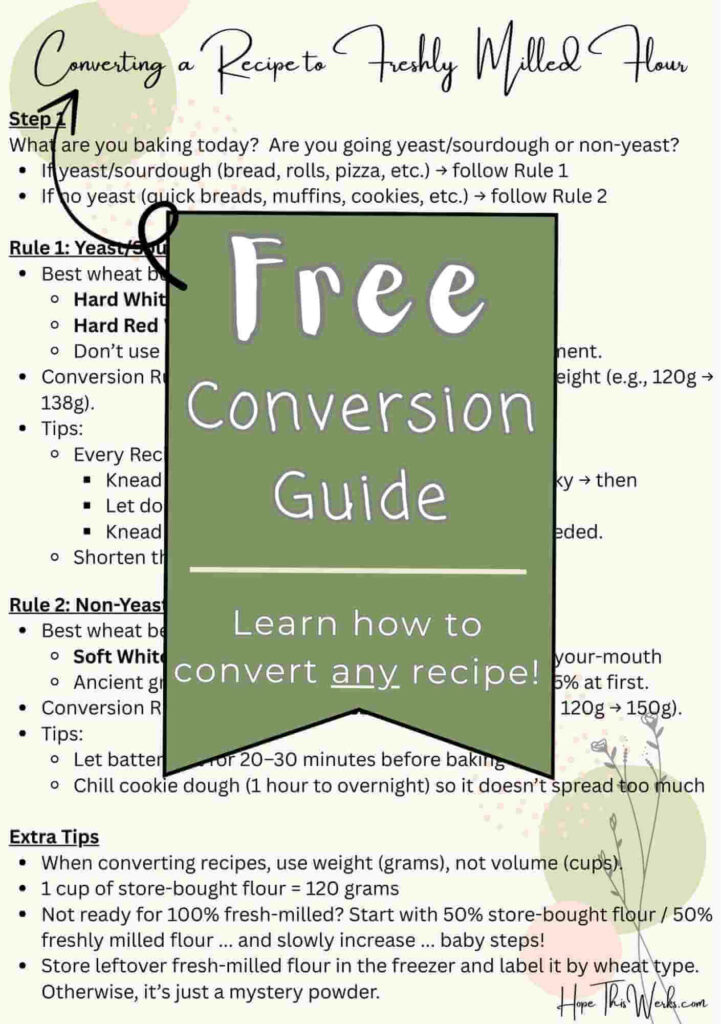
More Good News! I made a one-page cheat sheet that sums up this whole article … which is everything you need to convert any recipe to freshly milled flour. It’s FREE, cute, easy to keep in your kitchen, and basically your new baking BFF. Click here to grab it!
This article will walk you through exactly how to convert any recipe to freshly milled flour, step-by-step … whether your recipe uses yeast, sourdough, or no yeast at all.
Why You Should Convert a Recipe to Freshly Milled
Let’s start with the obvious question: Why bother? If you already own a mill, you probably have your reasons … but here are my top 2:
1. It’s Healthier
Freshly milled flour keeps all three parts of the wheat berry … bran, germ, and endosperm … intact.
That means:
- More fiber – intestines are happier
- Vitamins – little superheroes that keep your body running smoothly
- Antioxidants & healthy fats – that don’t make it into refined flour
- No preservatives or additives – that lurk in store-bought bags
In short: freshly ground flour is like the overachieving personal trainer of your pantry … it helps your digestion keep pace, steadies your blood sugar so you’re not riding the snack rollercoaster, provides slow-burning energy that lasts way past your morning coffee, and keeps you feeling full enough to skip those “just one more cookie” regrets. If you want the science behind all this goodness, here’s a health benefits article you might find interesting.
2. It’s Yummier
Let’s be honest: store-bought flour can taste … like cardboard. Freshly milled flour? It’s flavorful, aromatic, and turns even picky eaters into bread fanatics.
True story: my granddaughter (not even one yet) loves bread so much, she hugs it at mealtime … like it’s her long-lost best friend. My daughter doesn’t mind giving it to her every day because it’s packed with so much goodness, it’s basically a loaf-shaped multivitamin.

Can You Mix Store-Bought Flour and Freshly Milled Flour (to convert a recipe to freshly milled)?
Absolutely. Many bakers use a 50/50 mix … half store-bought flour and half freshly milled flour … just to get used to how fresh flour behaves. Some stay at that ratio forever. Others slowly bump up the fresh milled percentage until they’re at 100%.
Baking by Weight to Convert a Recipe to Freshly Milled Flour
Here’s the thing about converting recipes to freshly milled flour: weight (grams) matters more than volume (cups).
I’m usually more of a “dump-and-stir” baker … but when converting recipes, I get out my trusty kitchen scale (which is amazing – it’s this one).
I don’t mess with cups. Why? Because scooping wheat berries by weight is way easier than trying to guess how many wheat berries you should grind to get a cup of fluffy goodness (I’ll explain how to do this below).
Here’s the kicker: 1 cup of wheat berries ≠ 1 cup of flour. Once you mill wheat berries, you’ll usually get somewhere around 1⅓ to 1½ cups of flour.
And just to make life interesting, fresh milled flour absorbs liquid differently … thanks to the bran and germ hanging out in there. If you’re using cup measurements, you’ll miss adjusting for this … and your recipe might end up more “oops” than “artisan.”
Pro Tip: Wheat berries weigh the same before and after grinding.
Example: If your recipe calls for 120g of flour, measure 120g of wheat berries, grind them, and voilà … you’ll have exactly 120g of fresh flour.
Step 1: Decide If Your Recipe is Yeast or Non-Yeast (to convert the recipe to fresh milled flour)
This is where converting a recipe to freshly milled flour suddenly feels less like rocket science and more like following a simple treasure map. First, ask yourself:
- Does your recipe have yeast or sourdough starter hiding in there, doing its bubbly magic?
- Or are we going rogue with a non-yeast treat?
If it’s got yeast or sourdough, buckle up and follow Rule 1 … we’re diving into the world of rising dough (yeast/sourdough).
If it’s a non-yeast creation, welcome to Rule 2 … the land of quick breads, muffins, and other speedy delights (non-yeast).
Easy, right? Now let’s convert those recipes to freshly milled flour like the baking boss you are!
If yeast/sourdough → follow Rule 1.
If non-yeast → follow Rule 2.
Baked Items with Yeast/Sourdough
- Bread ( sourdough, made with yeast, artisan, etc.)
- Bagels
- Pizza dough
- Cinnamon rolls
- Soft pretzels
- Donuts (yeast-raised)
- Focaccia
- Challah
Baked Items without Yeast
- Biscotti
- Brownies
- Cakes (most types)
- Cupcakes
- Muffins
- Cookies
- Quick breads: banana, zucchini, pumpkin, etc.
- Scones
- Pie
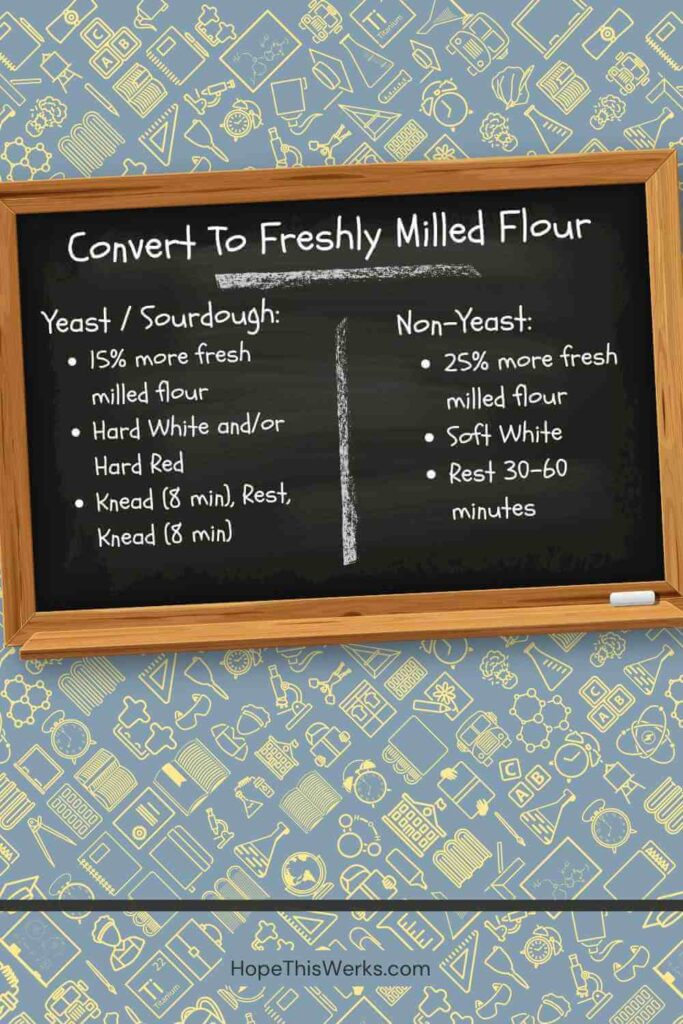
Rule 1: Conversion Formula for Yeast/Sourdough Recipes
Ok, now let’s talk about the rule for your baked goods that have yeast and/or sourdough.
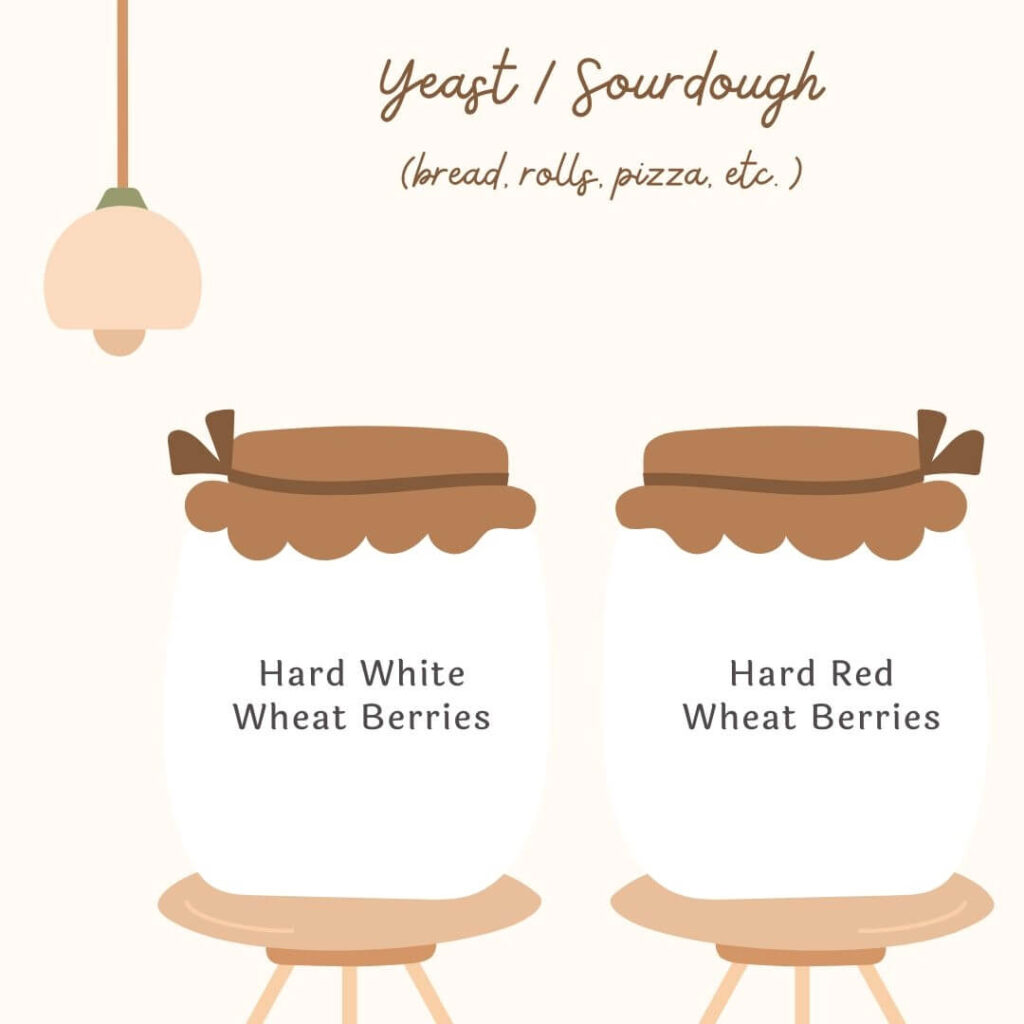
Best Type of Wheat Berries for Yeast/Sourdough
When you convert a recipe to freshly milled flour for a yeast or sourdough bake, choosing the right wheat berries is kind of like casting the lead actors in a movie. Pick the wrong stars, and your bread might flop harder than a bad sequel. Pick the right ones, and you’ll have a blockbuster loaf.
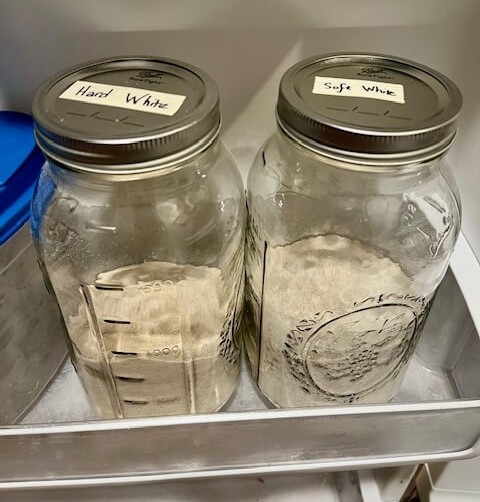
Hard White Wheat Berries
These are the smooth talkers of the wheat world. Mild in flavor, soft-spoken, and eager to blend in. They give you that classic fluffy texture that most people expect from bread. They’re the ones that can show up at a party (or a sandwich) and get along with everyone. If your goal is to convert a recipe to freshly milled flour without shocking your taste buds, hard white wheat is your safest starting point.
Hard Red Wheat Berries
Now here’s your bold, flavor-packed lead. Nutty, hearty, and full of personality, hard red wheat isn’t afraid to make a statement. It has a richer taste and slightly denser texture, making your bread taste like it came from an old-world artisan bakery instead of the back of your pantry.
Why Some Bakers Go 50/50
Think of hard white and hard red as the buddy-cop duo of the baking world. On their own, they’re each great. Together? They’re unstoppable. A half-and-half mix gives you the fluffiness and approachability of hard white, plus the flavor depth and character of hard red. This is the blend I reach for when I want my bread to taste like it worked hard to get into my oven.
Skip the Ancient Grains
Yes, kamut, einkorn, spelt, and emmer are beautiful, exotic, and full of intrigue… but they’re also a little high-maintenance. These ancient grains require special handling, different hydration, their weights are wacky, and … honestly, they need a little more patience than most of us have on a Tuesday night. When you’re first learning to convert a recipe to freshly milled flour, keep these on the bench until you’ve mastered the basics. Then, when you’re ready, bring them in with their own dedicated recipe.
Conversion Formula for Yeast/Sourdough Recipes
Important Facts:
- Store-bought flour = 120 grams per cup. Don’t take my word for it … King Arthur themselves say their all-purpose and bread flour both clock in at 120g per cup.
- When I started baking with fresh milled flour, I went full-on “spreadsheet nerd.” After weighing cup after cup of hard white ground flour and hard red ground flour, guess what? They also averaged 120 grams per cup. (Yes, I really did math for you.)
- Ancient grains? Yeah… they weigh all over the place. One cup of khorasan is not the same as one cup of spelt, einkorn, or farro … and none of them are equal to hard white or red wheat berries. That’s one of many reasons I don’t bother using them in my conversion.
If your recipe was originally written for store-bought flour, here’s the golden rule when you convert a recipe to freshly milled flour: grind 15% more fresh milled flour than the recipe calls for. Yes, I know … math in the kitchen can feel like a pop quiz you didn’t study for. But this one’s easy, and it’s worth it.
Here’s why you add 15%:
The bran and germ in freshly milled flour are like tiny, polite guests at a dinner party … they don’t hog the liquid the way refined flour does. That means your dough will feel a little looser if you use a one-to-one swap. Adding an extra 15% fresh milled flour brings back the structure, texture, and dough consistency you’re used to, without overcompensating or making your bread a brick.
Quick Conversion Table for Yeast/Sourdough Recipes
| Store-Bought Flour | Multiply By | Fresh Milled Flour Needed |
|---|---|---|
| 1 cup (120g) | × 1.15 | 138g |
| 1½ cups (180g) | × 1.15 | 207g |
| 2 cups (240g) | × 1.15 | 276g |
An Easy Way to Think About It:
If store-bought flour and fresh milled flour weigh the same amount, then why are we increasing the weight by 15%? Imagine your store-bought flour is that ultra-thirsty friend who drinks all the iced tea at the BBQ before anyone else gets a glass. Freshly milled flour is more of a “sip and savor” type, so you need to invite just a little more of it to the party to balance things out.
So, if your beloved cinnamon roll recipe calls for 120 grams of all-purpose flour, you’ll measure out 138 grams of wheat berries instead, run them through your mill, and voilà … you’ve got the perfect amount of fresh milled flour to make your yeast or sourdough recipe shine.
Tips to Convert a Recipe to Freshly Milled Flour for Yeast/Sourdough Items
Now let’s talk about the little tweaks that will keep your dough happy and your bread photogenic.
First Knead (a.k.a. The “Don’t Panic” Stage)
Plan on kneading for about 8 minutes, and keep the dough on the slightly wet side. Freshly milled flour takes its sweet time developing gluten and soaking in liquids … it’s basically the teenager of the baking world, so it needs a little extra encouragement before it decides to behave. Resist the urge to dump in extra flour too soon; let hydration work its magic.
Rest (a.k.a. Let the Dough Take a Break)
After the first knead, let your dough relax for 30–60 minutes. This isn’t wasted time … it’s hydration in action. Fresh milled flour has bran and germ that change everything in relation to soaking up the liquid like a sponge. Skip this step, and your dough just might crumble apart.
Second Knead (a.k.a. The “Now We’re Talking” Stage)
After your dough rests, knead again for another 8 minutes. This is when the gluten finally starts showing up to work. During this stage, you can add a touch more flour if absolutely necessary, but you’ll probably find you don’t need it. Fresh milled flour is a hydration hog … it’s amazing how much liquid it can drink up without complaint (it just takes some time).
Shorten the Bulk Ferment (a.k.a. Keep an Eye on the Clock)
Fresh milled flour ferments faster than store-bought flour. If you let it go too long, you’ll end up with an over-proofed loaf that collapses like a poorly pitched tent. Check your dough earlier than you think you should, and trust your eyes over the timer. Start your shaping stage a little sooner than you would have with store-bought flour.
Proceed with Recipe (a.k.a. Time to Shine)
Once you’ve made these adjustments, you can go back to your original recipe and finish as written. The only difference is now you’ve got a loaf that’s fresher, healthier, and probably tastier than anything your store-bought flour could have pulled off.
Don’t forget … I made a one-page cheat sheet that sums up everything you need to convert any recipe to freshly milled flour. Grab it for free, stick it in your kitchen, and never wonder “how much flour?” again! (Grab your Cheat Sheet Here)

Rule 2: How to Convert a Non-Yeast Recipe to Freshly Milled Flour
If your recipe doesn’t have yeast or sourdough, congratulations … you’ve entered the land of quick breads, muffins, cookies, and other treats that don’t need hours of babysitting. Converting a recipe to freshly milled flour here is a little different, but equally rewarding. The first step? Choosing the right wheat berries gives your non-yeast bakes the perfect texture and flavor.
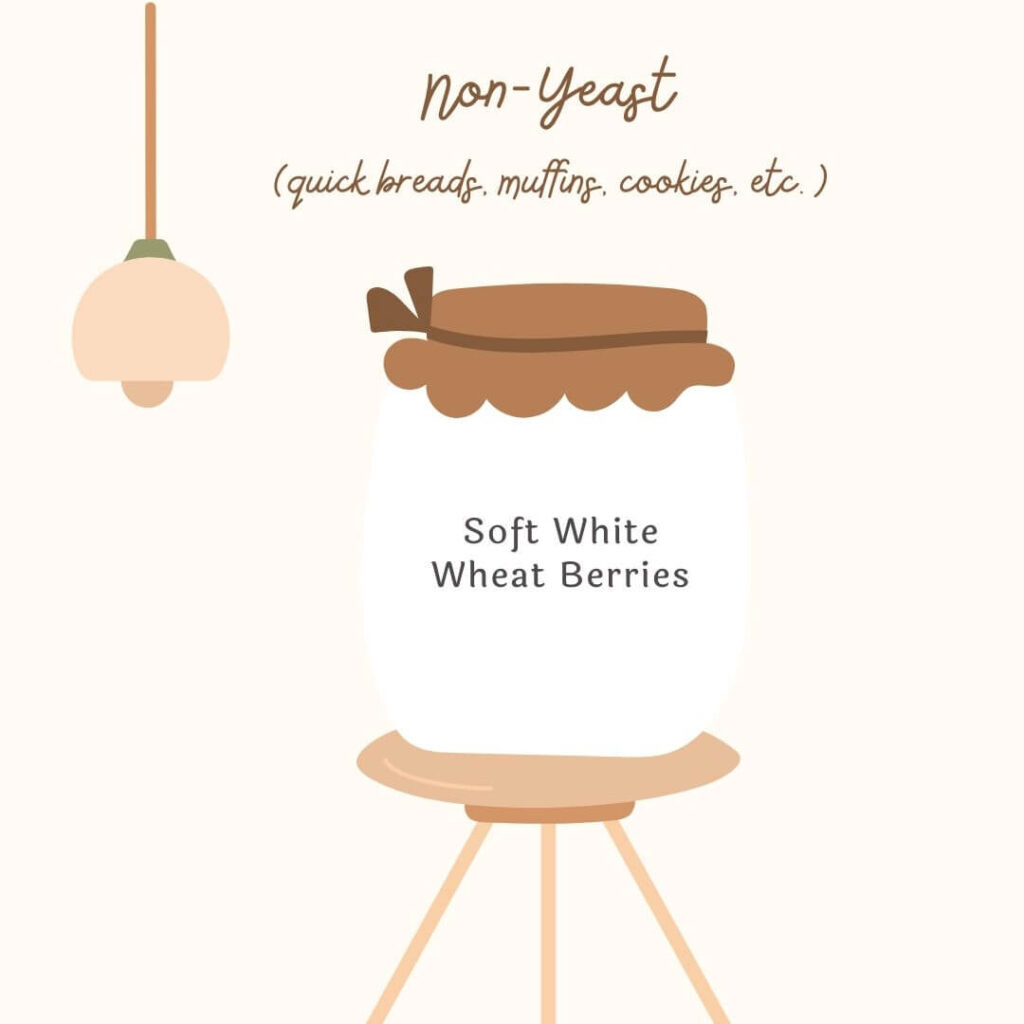
Best Type of Wheat Berry for Non-Yeast Baked Goods
When it comes to recipes without yeast (cookies, cakes, muffins, and quick breads), you want your flour to behave like a gentle hug, not a gluten wrestling match. That’s where Soft White Wheat Berries shine. They’re low in gluten (meaning less chew, more tenderness), and they give your bakes that delicate crumb you’d expect from store-bought pastry flour… but with all the fresh flavor and nutrition of freshly milled goodness.
This is also prime territory for a little adventure once you have mastered the recipe with soft white. Are you desperate to try ancient grains … you want to open that bag of kamut/khorasan, einkorn, spelt, or emmer? Ancient grains are quirky … some have less gluten, and others throw a tantrum if you stir them too much. That’s why non-yeast baked goods are the best playground to try them out. Start slow: swap about 25% of your flour for an ancient grain. You’ll taste the difference without wrecking the texture. And if you fall head-over-heels for the flavor, you can always crank it up in your next batch.
Conversion of Flour
For all our conversions, we’re using 120 grams per cup as the standard weight for store-bought flour … even pastry flour.
And guess what? Soft white wheat flour plays nicely… we are also going to use 120 grams per cup. (Finally, something that is easy to remember in the kitchen!)
Use 25% More Freshly Milled Flour Than the Recipe Calls For
If your recipe was written for store-bought flour, here’s the golden rule: bring a little extra to the party. You’ll want to use 25% more freshly milled flour than what’s listed.
Quick Conversion Table for Non-Yeast Recipes
| Store-Bought Flour | Multiply By | Fresh Milled Flour Needed |
|---|---|---|
| 1 cup (120g) | × 1.25 | 150g |
| 1½ cups (180g) | × 1.25 | 225g |
| 2 cups (240g) | × 1.25 | 300g |
Why? Because fresh flour isn’t stripped of its bran and germ like the fluffy, pale stuff from the grocery store. That extra nutrition and flavor mean it also soaks up liquid a little differently. Without the refinement process, the flour particles are more varied in size and shape … kind of like a party where everyone’s wearing a different hat. This gives your dough a slightly looser feel, so the extra 25% helps you land on the right consistency. Also, this accounts for a soft white actually weighing a little less than 120 grams (trust me on this one … it works this way).
Chart for Non-Yeast Conversions
| Recipe is Asking For | Amount of Wheat Berries to Grind |
|---|---|
| ¼ cup | 38 grams |
| ⅓ cup | 50 grams |
| ½ cup | 75 grams |
| ⅔ cup | 100 grams |
| ¾ cup | 113 grams |
| 1 cup | 150 grams |
| 1 ½ cups | 225 grams |
| 2 cups | 300 grams |
Now, grab that flour and toss it straight into your grinder. I crank mine up to the finest setting … because when you convert a recipe to freshly milled flour, you want it as smooth as possible.
Once it’s all ground up, I dump every last bit of that fresh milled flour right into my batter or dough. Unlike with yeast or sourdough recipes where I save some flour for the second knead, this time … there’s no holding back. It’s an all-in, no-holds-barred flour party in my mixing bowl.
Non-Yeast Freshly Milled Flour Baking Tips
Rest Batter/Dough – Give your batter or dough at least 30 minutes to hydrate before baking. This gives the flour time to soak up moisture and soften, so your baked goods don’t end up with the texture of a well-used loofah.
Cookies – If your cookies are spreading out, chill the dough in the fridge (from 2 hours to overnight) before baking. The cooler temperature firms up the butter and gives the flour more time to fully hydrate, resulting in cookies that keep their shape instead of going full pancake mode.
I’m a big fan of letting my cookie dough have a little “me time” in the fridge overnight. Here’s the game plan: line a cookie sheet with parchment, scoop out your dough balls, cover them up, and let them chill. The next day (or even two later), bake them whenever your sweet tooth says it’s time.
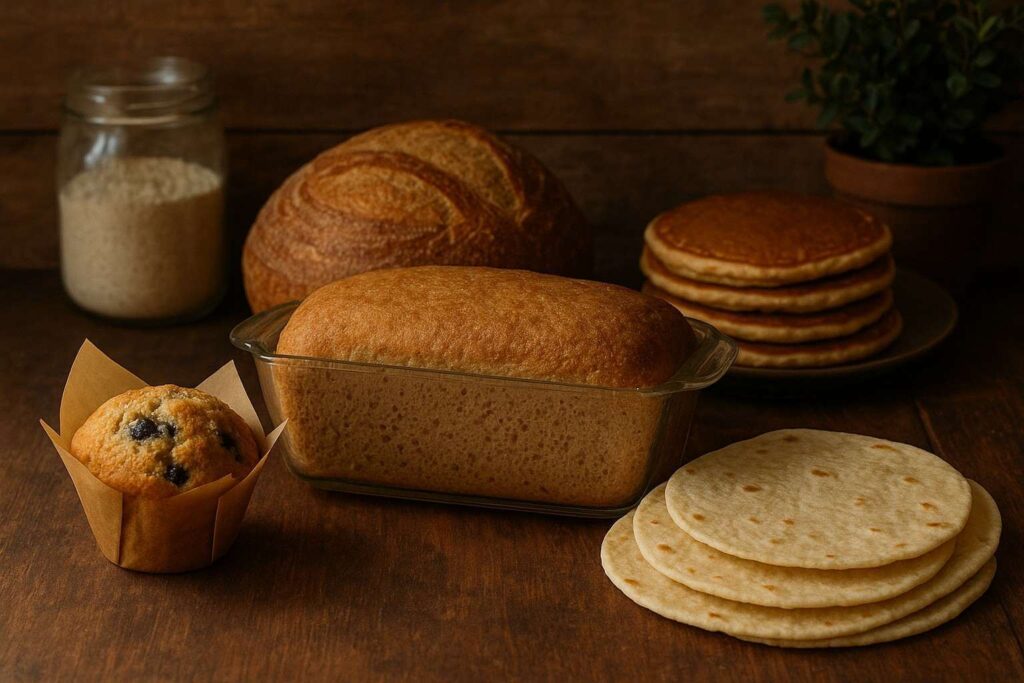
Examples of Recipes You Can Convert to Freshly Milled Flour (Because Why Stop at One?)
On my website, I like to keep things super clear (and a little fancy) by writing two separate recipe cards for many of my baked goods. One card is for the classic store-bought flour crowd, and the other is specially crafted for those of us who want to convert a recipe to freshly milled flour.
You can peek at these side-by-side and instantly get the hang of how to switch out your old flour for the fresh stuff.
Here are a few of my favorites you might want to take a peek at:
Yeast/Sourdough Stars
- Sourdough Artisan Bread — The classic showstopper. If converting a recipe to freshly milled flour could win awards, this would be the bread version of an Oscar.
- Sourdough Sandwich Bread — Soft, fluffy, and perfect for PB&Js or turkey stacks. Freshly milled flour turns this everyday hero into a nutritional powerhouse.
- Hamburger Buns — Because your burger deserves a bun that’s as fresh and wholesome as the patty itself.
Non-Yeast Crowd-Pleasers
- Blueberry Muffins — Sweet, tender, and bursting with berries. Freshly milled flour makes these muffins taste like you just bought them at a fancy bakery (without the price tag).
- Pancakes — Morning magic in a stack. Converting your pancake recipe to freshly milled flour adds nuttiness and depth you didn’t even know you wanted.
- Tortillas — Homemade, soft, and way better than store-bought. With freshly milled flour, your tortillas become the star of every taco night.
Try converting a recipe to freshly milled flour from this list, and soon you’ll be tackling your entire recipe book like a fresh-milled flour ninja.
Storing Extra Freshly Milled Flour (Because Nobody Likes Waste)
So, the weather was dry today, and your dough didn’t want the extra calories of flour. No worries! Freshly milled flour loves a good chill, so store any extra in an airtight container and pop it into the freezer. This keeps your flour fresh, tasty, and ready for whenever inspiration (or a sudden craving) strikes.
Pro tip: keep separate containers for different wheat varieties AND label the containers. Trust me, your future self will thank you when you reach in and grab exactly the flour you need without a “which one is which?” moment.
Conclusion: You’ve Got This (Really, You Do)
With just a bit of practice, converting recipes to freshly milled flour will feel as natural as breathing (or scrolling through your phone, but way more rewarding). You’ll be baking loaves that Great-Grandma would nod approvingly at … if she weren’t too busy sneaking a slice herself.
Best of all? Your family will enjoy healthier, more flavorful baked goods that make every meal feel like a celebration.
Want an easier way to remember all this? I made this one-page cheat sheet that wraps up everything about converting recipes to freshly milled flour. It’s free, it’s handy, and it’s perfect to keep in your kitchen for quick reference … because nobody wants to scroll through a long blog while baking!
Be sure to check out my other recipes, tutorials, and guides to keep your fresh milled flour baking journey going strong. There’s a whole world of floury fun waiting for you. Or you can follow my baking shenanigans over on Instagram!
And if you want to make sure you never miss a fun, new post (and who wouldn’t want to?), subscribe right here. As a thank-you, I’ll send you a FREE gorgeous recipe card for the best pancakes on earth. Trust me, you’ll want them in your life.
Wheat Berry Selector Summary
| Recipe Type | Hard White | Hard Red | Soft White | 50/50 Mix | Ancient Grains |
|---|---|---|---|---|---|
| Yeast/Sourdough | ✅ | ✅ | ❌ | ✅ | ❌ |
| Non-Yeast | ❌ | ❌ | ✅ | ✅ | ✅ (start small) |
Yeast Dough - Fresh Milled Flour Summary
| Stage | Time | Purpose |
|---|---|---|
| First Knead | 8 min | Develop initial gluten |
| Rest | 30–60 min | Hydrate |
| Second Knead | 8 min | Strengthen gluten |
| Bulk Ferment | Shortened | Prevent over-proofing |
| Shaping & Baking | As recipe | Final texture & rise |
portions of this content may have been generated or refined using AI


6 responses to “How to Convert a Recipe to Freshly Milled Flour”
I referenced this more than once this week! Thanks so much for the help with this article! Love it!
Referenced more than once … that officially makes us coworkers in the kitchen now.
I’ve been milling my flour – and have only used freshly milled flour since January 2024. I stumbled upon your site and I’ve bookmarked it so I can easily share with others that I help get started on this path. You’ve done an outstanding job in compiling helpful information in one place. THANK YOU!
Oh wow … a new fresh milled friend! You are amazing! Thank you so much for bookmarking and sharing … that truly makes my day. I love hearing that this little corner of the internet is useful to others on the same journey. Thanks!
Ok, now this is helpful. I NEEDED this info because I have piles of recipes I already love. Thank you for the help!
Ha! Piles of recipes are basically a rite of passage in the baking world. Think of me as your fresh milled flour translator: turning your beloved recipes into nutrient-packed masterpieces without the panic. Happy milling!