Welcome to

Hope this Werks

Fresh milled. Real Food. Pure energy.

Fresh Milled Flour Focaccia (or store flour) – Easy Yeast Recipe

Updated: August 4, 2026

Golden. Crispy. Dimpled. Swimming in olive oil. If bread had a personality, fresh milled flour focaccia would be the friend who somehow looks effortlessly put together without even trying.

The outside bakes into a beautifully crisp crust, while the inside stays soft, airy, and full of those irresistible little pockets that make you keep reaching for “just one more piece.”

Even better? It only takes five simple ingredients and about five minutes of hands-on work. Seriously. Most of the recipe consists of letting the dough happily do its own thing while you go live your life.

Whether you’re making this fresh milled flour focaccia with freshly ground wheat or using store-bought flour, you’ll end up with a better-than-bakery-worthy bread that tastes like you spent all day making it. Thankfully, we’ll keep that little secret between us.

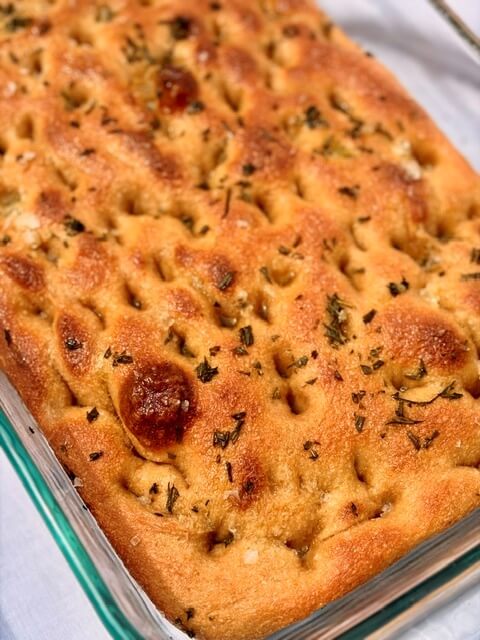
Fresh Milled Focaccia in a pan on a white tablecloth

Focaccia Changing the Restaurant Scene

There is a new restaurant near my house that everyone has been talking about lately. Not just talking … Obsessing. Every conversation somehow drifted back to the same menu item. “The BLT.”

Now, I’ll admit it. My first thought was … “Really? A BLT?” I mean, it’s bacon, lettuce, and tomato. We’ve all met one before.

But then another person mentioned it. And another. Then another. Finally, curiosity won.

Oddly enough, nobody spent much time talking about the bacon. Or the lettuce. Or even the tomatoes. Instead, every single person kept raving about the homemade focaccia holding the sandwich together.

That’s when it hit me.

A truly great loaf of focaccia doesn’t just support the sandwich … it steals the entire show. It’s kind of like going to a concert expecting to love the lead singer, only to leave talking about the drummer. Good focaccia has that effect. In fact, it can put a restaurant on the map. And honestly … it might just make you famous among your friends too.

But First, Let's Learn How to Spell It

Can we have a quick heart-to-heart? Every time I type “focaccia” … I hesitate. I know there are a bunch of C’s hiding in there somewhere. I just never remember where they’re supposed to go. So I finally came up with a little memory trick that has completely solved the problem.

Here’s how I remember it:

  • FO = Flour

  • CA = Carbs (the delicious kind)

  • CC = Crispy Crust (one C for the top, one C for the bottom)

  • IA = “I Ate!”

To say it out loud: “foh-KAH-chuh.”

Suddenly, all those letters start behaving themselves. Now that we’ve conquered the spelling, let’s make some bread.

Fresh Milled Flour Focaccia Starts With the Right Wheat Berries

If you’re making fresh milled flour focaccia, first of all … yay! You’re about to sneak a whole lot of nutrition into something that tastes completely indulgent.

The very first decision you’ll make is choosing your wheat berries. Personally, I always reach for 100% hard white wheat berries. Could you use hard red wheat? Absolutely, but it will be a little heavier tasting. Would I recommend soft white wheat? Not for this recipe.

Soft white wheat shines in biscuits, muffins, cakes, and cookies. However, focaccia needs enough gluten strength to trap all those beautiful air bubbles we’re chasing, so hard wheat is the better choice.

As for ancient grains… that’s an entirely different rabbit hole. I’ve written a full guide on choosing the right wheat berry for every recipe because each one behaves a little differently.

If I had to summarize it in one sentence, it would be this: Hard white wheat gives you a lighter crumb while letting the olive oil, herbs, and toppings be the stars of the show instead of competing with them.

Add to Your Mixing Bowl

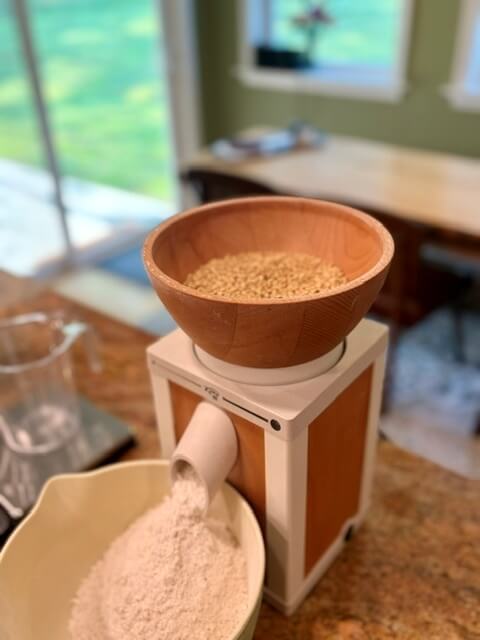
Next, weigh out 550 grams of wheat berries, which is roughly 2¾ cups if you don’t feel like pulling out your kitchen scale. Run them through your grain mill until the flour is nice and fine. You’ll end up with about 5 cups of freshly milled flour.

Unlike many yeast breads where the flour gets added little by little, this fresh milled flour focaccia recipe is wonderfully uncomplicated. Think banana bread instead of sandwich bread. Everything goes into the bowl at once. Easy.

One thing you’ll notice throughout my recipes is that I almost always include instructions for both fresh milled flour and store-bought flour. I do that on purpose. Maybe today you’re baking with fresh flour. Maybe tomorrow you’ll want to convert your grandmother’s favorite bread recipe. You can compare these two recipes to see what I do differently. Also, here is an overview article that will also help you convert any recipe. 

Or maybe your best friend asks, “Can I make this without a grain mill?” I want every recipe on Hope This Werks to answer those questions without sending you on a scavenger hunt across the internet. So whether you’re baking focaccia with fresh ground flour today or trying freshly milled flour for the very first time, you’ll find instructions that work.

Store-Bought Flour

Not everyone has a grain mill sitting on the counter. And that’s perfectly okay. If you’re making this focaccia with bread flour from the grocery store, you’re still going to end up with an absolutely delicious loaf.

Simply measure 4 cups of bread flour into your mixing bowl.

If bread flour isn’t hanging out in your pantry, all-purpose flour will also work. Your loaf may not rise quite as dramatically because bread flour develops stronger gluten, but you’ll still have a wonderfully soft and flavorful focaccia. The only flour I’d avoid is pastry flour. That’s a little like asking a tricycle to tow a camper. It’s simply not built for the job.

Just like our freshly milled flour version, you’ll add all of the flour to the bowl at once. No fancy techniques. No complicated steps. Sometimes the simplest recipes really are the best ones.

Throw Everything Else in the Bowl

One of my favorite things about this fresh milled flour focaccia recipe (or with store flour) is that it doesn’t ask you to juggle a bunch of bowls or follow twenty-seven tiny steps. You simply gather everything together, toss it into one mixing bowl, and let the magic begin.

Once your flour is in the bowl, add the salt and yeast. Give everything a quick stir so the yeast and salt are evenly distributed before the water joins the party. It only takes a few seconds, but it helps everything mix together more evenly later.

Now, let’s talk about yeast for just a minute.

Lately, I’ve become a big fan of instant yeast because it’s wonderfully low maintenance. You can simply sprinkle it right into the flour and keep moving. No blooming. No waiting. No wondering if you’ve accidentally murdered it.

The funny thing is that active dry yeast has changed over the years too. These days, many brands can also be mixed directly into the flour without proofing first. So unless the package specifically tells you otherwise, you can usually skip that extra step.

That said, if my yeast has been sitting quietly for several months, I’ll still proof it anyway. Think of it like texting an old friend before driving across town to meet them. I’d rather know they’re awake before I commit to the trip.

Water & Olive Oil for Fresh Milled Flour Focaccia

Next, pour in the warm water and olive oil. Notice I said warm, not hot. Yeast is a little dramatic. Water that’s too cold encourages it to curl up for another nap, while water that’s too hot sends it into early retirement. Warm water keeps everyone happy and ready to get to work.

Now let’s give a little appreciation to the olive oil.

The very first focaccia recipe I experimented with didn’t include olive oil in the dough itself. It was only brushed over the top. Then I started reading more about authentic Italian focaccia and realized many traditional recipes include olive oil both inside the dough and generously on top.

Well… that sounded like a delicious idea. So I happily stole it.

Adding just a couple of tablespoons to the dough makes the crumb a little softer, adds flavor throughout the bread, and helps create that wonderfully tender bite that makes you reach for another piece before you’ve even finished the first one.

If you happen to own a flavored olive oil, this is one of my favorite places to use it. Instead of only tasting those herbs on the crust, the flavor gently works its way through the entire loaf. It’s a little like adding vanilla to cake batter instead of brushing it on after baking … it becomes part of every bite instead of just decorating the outside.

I have one particular flavored oil recipe that I absolutely love. Honestly, it’s one of those mixtures that makes you wonder whether bread is just an excuse to eat the oil. If you would like the recipe, I am happy to share it with you right here.

Once everything is in the bowl, mix it until you have one gloriously shaggy, sticky dough.

Fresh Milled Flour Focaccia: The 8-20-8 Secret

If you’re making focaccia with freshly milled flour, this is where our paths split for a little while. Store-bought flour behaves differently, so we’ll meet back up in just a few minutes.

Freshly milled flour simply needs a little extra encouragement before it becomes the soft, airy bread we’re after. That’s why I use what I call my secret 8-20-8 method.

Knead Your Fresh Milled Flour Focaccia

First, knead the dough in your stand mixer for 8 minutes.

Freshly milled flour contains all of the bran and wheat germ, which makes gluten development a little slower than it is with store-bought flour. The gluten can absolutely do its job … it just appreciates having a little more time to get organized.

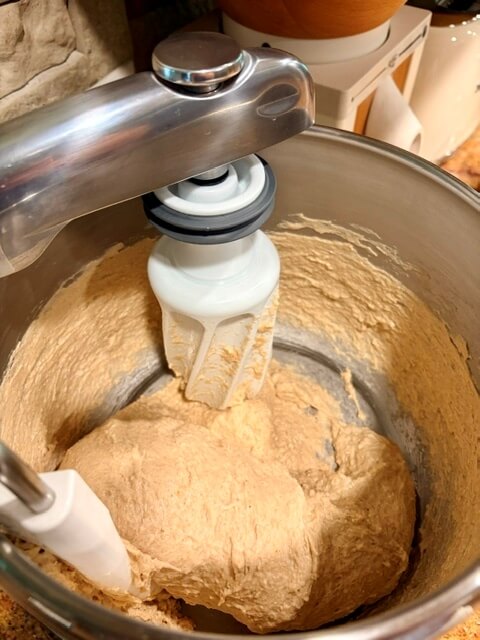
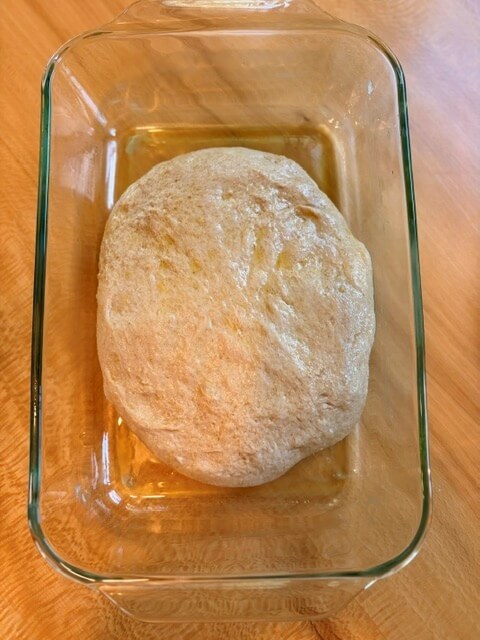
Now I need to give you a warning, because this is the moment when almost everyone starts questioning the recipe. Your dough is going to look unbelievably wet.

It will be sticky.

It will cling to the bowl.

Clinging to your fingers will absolutely happen.

You may wonder if you accidentally forgot to include another cup of flour. You didn’t. Please resist the temptation to add more flour. Trust me … I know exactly how strong that temptation is because I’ve given in before. Every single time I did, I ended up with a denser loaf that didn’t have that beautiful airy texture I was hoping for.

This dough is supposed to feel messy. That’s actually one of the secrets to great fresh milled flour focaccia.

So, how do you know your hydration is right? Your dough shouldn’t form a neat little ball like sandwich bread. Instead, it will still be sticking to the sides of the mixing bowl. If you poke it with your finger, you’ll probably pull your finger right back out wearing a dough mitten. That’s exactly what we’re looking for.

Rest Your Fresh Milled Flour Focaccia

After those first 8 minutes, let the dough rest for 20 minutes.

That little rest gives the flour time to slowly drink in the water, which makes the dough smoother, softer, and much easier to work with during the second kneading.

Knead Your Fresh Milled Flour Focaccia Again

Once the rest is over, knead the dough for 8 more minutes.

This final knead strengthens the gluten network so it can hold onto all those precious bubbles. You can imagine the gluten like thousands of tiny balloons tied together with stretchy rubber bands. The stronger those bands become, the better they protect the air pockets during rising and baking.

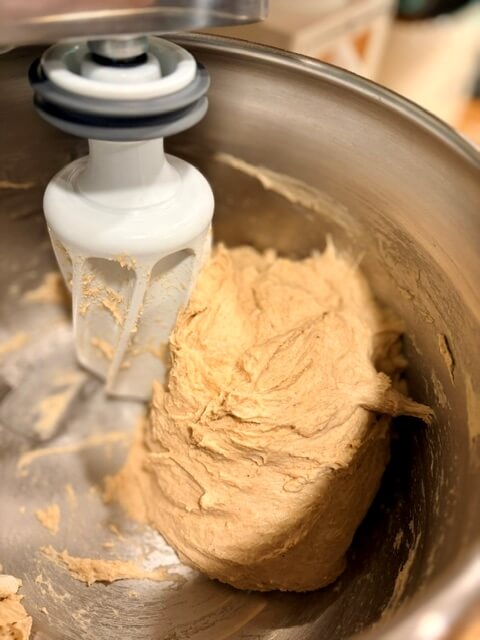
Even after those final eight minutes, your dough should still feel sticky … but it will be less sticky now. It may begin pulling together into something that resembles a very wet dough ball, but it should never look like a smooth, tidy loaf of sandwich bread. In fact, if your dough looks picture-perfect at this stage, it’s probably wearing more flour than it needs. A little sticky now leads to a wonderfully light loaf later.

My fresh milled friends can now skip ahead while we catch up with everyone using store-bought flour.

Fresh Milled Flour Focaccia dough in an Ankarsrum mixing bowl
After Kneading for First 8 Minutes ... Very Wet Dough!
After Resting for 30 Minutes & Kneading for 8 More Minutes ... the fresh milled flour sipped up a bunch of water

Store-Bought Flour

If you’re making this fresh milled flour focaccia recipe with store-bought bread flour instead, welcome back! Thanks for patiently hanging out while my fresh milled friends got their extra coaching session.

The good news is that your dough doesn’t need as much work.

Go ahead and knead it in your stand mixer for about 3–4 minutes. That’s usually enough time to get the gluten developing and headed in the right direction.

Now, don’t let the shorter kneading time fool you into thinking your dough should look any different. Just like the freshly milled version, this dough should still be wonderfully wet and sticky. In fact, if you’re thinking, “Wow… this is kind of a mess,” you’re probably right where you need to be.

A properly hydrated focaccia dough isn’t interested in winning any beauty contests. It won’t form a tidy little dough ball, and it certainly won’t politely let go of your fingers. Instead, it clings to everything like a toddler who just found out you’re leaving for date night. Believe it or not, that’s a very good sign.

All that extra water is what helps create those gorgeous air pockets that make focaccia so light and chewy. However, if your dough is so loose that it won’t come together at all … not even into a shaggy mound … feel free to sprinkle in a tablespoon of flour at a time until it reaches the right consistency. Just resist the urge to dump in a whole cup.

Curious About Fresh Milled Flour?

And if you’re wondering whether making your own flour is worth the effort, I’d encourage you to take a look at baking with fresh milled flour sometime. Besides the incredible flavor, many people are surprised to learn how many nutrients freshly milled flour retains compared to store-bought flour. That’s usually the conversation that convinces people to dust off a grain mill … or start shopping for one.

One Stretch-and-Fold Is All It Needs

Now our two doughs meet back up again. Whether you’re making focaccia with freshly milled flour or store-bought flour, the next step is exactly the same.

Before you touch the dough, walk over to the sink and wet your hands. Seriously. Don’t skip this part. With a high-hydration dough like this one, wet hands are like having a superpower. Instead of wearing half the dough on your fingers, you’ll actually be able to move it around without too much drama.

Next, we’re going to do one stretch-and-fold. If you’ve never heard that term before, don’t let it intimidate you. It sounds much fancier than it actually is. Imagine your bowl is a compass. Grab the dough at the north side of the bowl, gently stretch it upward, fold it over the center, and tuck it toward the south side. Then rotate the bowl and repeat with the east, south, and west sides until you’ve worked your way all the way around. That’s it. You’ve officially completed one stretch-and-fold.

When I’m making sourdough, I often repeat this process several times over the course of a few hours because sourdough loves building extra strength. This fresh ground focaccia recipe doesn’t need nearly that much attention. One gentle round is enough to give the dough a little extra structure without turning it into a loaf of sandwich bread.

Hang Time

Now that you’ve finished wrestling with the sticky dough, it’s probably time to wash your hands again.

And, congratulations! You successfully resisted adding extra flour, and your future self is going to thank you when you bite into that wonderfully airy loaf.

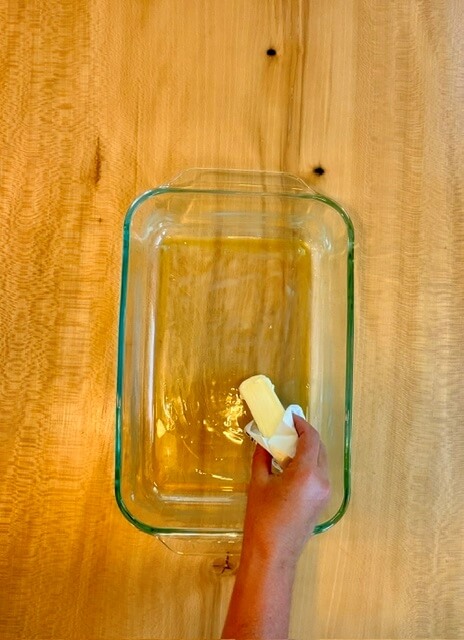
Next, grab a 9 x 13-inch baking pan and generously rub the entire inside with butter. Don’t be shy here. Cover the bottom, the corners, and every last inch of the sides. Then drizzle 2 tablespoons of olive oil into the pan and spread it around until everything has a glossy coating. I like to think of this as double insurance.  If you have flavored olive oil, this is another wonderful place to use it. Otherwise, regular olive oil works beautifully too.

Feeling generous? This is also a fantastic recipe to share. Instead of making one large loaf, you can divide the dough between two pie plates and surprise a neighbor with one. Everything stays exactly the same except dividing everything in half … and the baking time, which will be a little shorter because the loaves are smaller.

Sometimes, before I transfer the dough to the pan, I’ll quickly shape it into a loose ball to create a little surface tension. It isn’t required, and honestly, I skip it about half the time. However, if you enjoy playing around with bread techniques, it can help the dough hold onto a few more of those precious air pockets.

More Olive Oil for Your Fresh Milled Flour Focaccia

Whether you shape it or simply scoop it straight into the pan, drizzle another 2 tablespoons of olive oil over the top of the dough. Then gently encourage it toward the edges of the pan. Notice I said encourage. Don’t force it.

At this stage, the dough is like a teenager on Saturday morning … it has absolutely no interest in going where you’re asking it to go. It’ll stretch a little, stop halfway, and basically tell you, “Maybe later.” That’s perfectly normal. As the dough rises, it’ll happily spread the rest of the way all on its own.

Cover the pan and let it rest until the dough has expanded enough to fill the pan and has become wonderfully puffy. Depending on the temperature of your kitchen, this usually takes somewhere between 1 and 2 hours. By the end of the rise, it should have more than doubled in size.

Now comes one of the most valuable bread-baking skills you can learn.

Instead of watching the clock (1-2 hours) …

Learn to watch your dough. Here are your clues to watch for …

How to Know When Your Dough is Ready

Bread recipes love giving exact times. Real dough … not so much.

Some days your kitchen is warm. Other days it’s cool. Maybe your yeast is especially energetic today, or maybe it’s taking its sweet time. That’s why experienced bakers eventually stop relying on timers and start reading the dough itself.

Thankfully, your dough gives lots of clues.

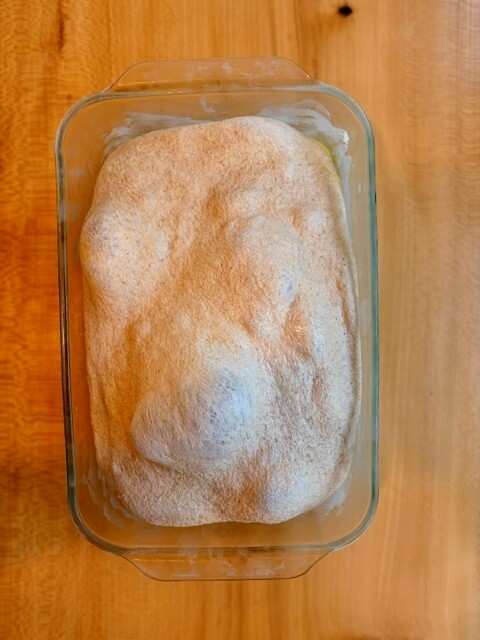
When it’s ready to bake, it should look puffy and slightly domed, almost like it’s proudly standing a little taller. You’ll probably notice bubbles hiding just beneath the surface, and when you gently nudge the pan, the dough should feel soft and pillowy while still holding its shape.

On the other hand, overproofed dough tells a very different story. Instead of looking lively, it begins to look tired. The center may flatten or sink, bubbles may collapse, and the dough often spreads outward instead of standing tall. If you poke it and the indentation stays there … or worse, the dough deflates around your finger … it’s letting you know it has risen a little too long.

Your nose can even help. A properly proofed loaf smells pleasantly yeasty with just a hint of sweetness. However, if it starts smelling strongly sour, overly tangy, or a bit boozy, it’s usually a sign that fermentation has gone farther than you intended.

Favorite Rule for Fresh Milled Flour Focaccia

Here’s my favorite rule of thumb: If your dough looks excited to get into the oven, it’s ready. If it looks like it needs a nap… It’s probably overproofed.

One thing I’ve learned while baking focaccia with fresh milled wheat is that freshly milled flour tends to move a little faster than store-bought flour because all those naturally occurring enzymes are still present. That’s one more reason I encourage watching your dough instead of obsessing over the timer.

Once you learn to read these little clues, bread baking becomes so much less stressful. Instead of wondering whether you’re getting it right, you’ll start trusting what your dough is telling you … and that’s when making focaccia with freshly milled flour becomes one of the most forgiving and rewarding breads you’ll ever bake.

Before Its Rise
Ready To Go!

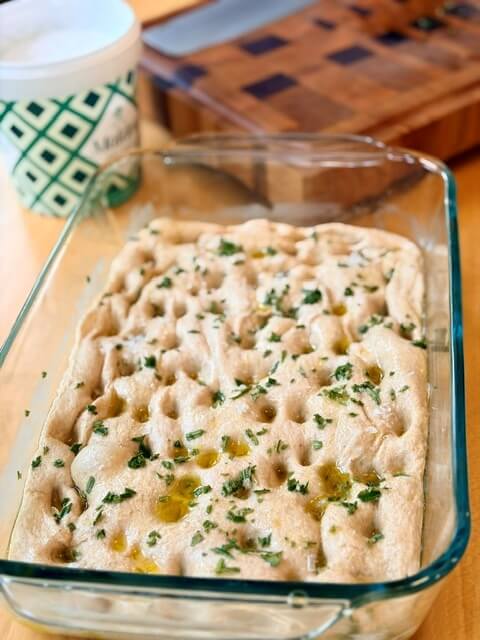
Making Those Dimps

If you’ve ever looked at a loaf of focaccia and wondered why someone poked a bunch of holes all over the top … you’re about to become that person.

Once your dough looks like it’s almost finished rising, go ahead and preheat your oven to 450°F. Don’t wait until the last minute. A really hot oven is one of the biggest secrets to an airy loaf because the blast of heat gives your dough one final burst of energy before the crust sets. 

I’d much rather have my oven standing around waiting on the dough than have the dough standing around waiting on the oven. Every extra minute the dough sits after it’s fully proofed gives those beautiful air bubbles another chance to slowly fade away.

While the oven finishes heating, drizzle 2 more tablespoons of olive oil over the top of your dough (plain or flavored). 

Now comes the part everyone recognizes. It’s time to make the dimples.

Using all of your fingertips, gently press straight down until you reach the bottom of the pan. I usually make about eight sets of dimples, spreading them evenly across the dough.

As your fingers press downward, you’re not trying to pop all of those air bubbles. Instead, think of yourself as gently scooting those air pockets off to the side. That’s exactly what you want to happen. The dimples create little pools for olive oil to collect, while the bubbles hiding underneath stay safely tucked inside the dough.

Details About Dimps

Now let’s answer one of the questions I hear surprisingly often. “I spent all that time creating beautiful bubbles… and then I dimpled the dough. Did I just ruin everything?” Probably not.

In a well-developed loaf of focaccia with freshly milled flour (or store-bought flour), dimpling should only collapse the bubbles sitting near the surface. The larger network of bubbles tucked deeper inside the dough should stay intact. That’s exactly why classic focaccia can have dramatic dimples on top while still baking into a wonderfully open, airy crumb.

However, if nearly all of your bubbles disappear every time you dimple the dough, there are usually two possible explanations.

  1. The first is that your gluten network wasn’t quite strong enough. Strong gluten creates thousands of tiny individual air pockets. Weak gluten lets everything collapse together like one giant balloon.

  2. The second possibility is that most of your bubbles collected near the surface instead of being evenly distributed throughout the dough. That sometimes happens with very wet doughs because the gas naturally rises upward while the dough is proofing.

Fortunately, both situations are easy to improve.

Four Tricks for Better Dimps

If your dough tends to deflate during dimpling, here are a few simple adjustments that usually make a big difference.

  1. First, try dimpling more gently. Instead of pressing quickly with a lot of force, slow down and let your fingertips ease into the dough. 

  2. Second, always dimple immediately before baking. Once you’ve made those beautiful little wells, don’t let the dough sit around on the counter while you finish cleaning the kitchen or answer a phone call. Instead, slide the pan into the oven right away. The less time your dough spends waiting, the more bubbles it gets to keep.

  3. Third, make sure your oven is completely preheated before you slide it in. I know it’s tempting to shave off a few minutes, especially when the bread looks ready to go. However, that intense burst of heat is what gives the dough its final lift before the crust begins to set.

  4. Fourth, if this happens often, spend a little more time strengthening your gluten earlier in the process. An extra stretch-and-fold or slightly longer kneading can give the dough just enough additional structure to support those beautiful air pockets all the way through baking.

The wonderful thing about bread baking is that tiny adjustments often create surprisingly big improvements. And honestly? Even the loaves that don’t turn out exactly the way you pictured still taste pretty amazin

Rosemary, Salt, and a Little Story From Pittsburgh

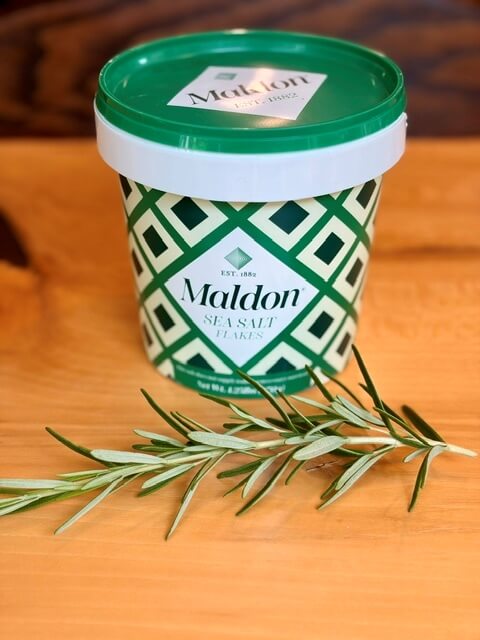
Once your dimples are finished, sprinkle flaky sea salt generously across the top.

Now… let’s talk about salt for a second. I have fondly made trips to Pittsburgh, where we have a bakery that is famous for something called salt sticks. Imagine a soft breadstick wearing what feels like an entire snowstorm of salt. They’re wonderfully chewy. Wonderfully salty. And somehow completely irresistible.

I usually recommend about 2 to 3 tablespoons of flaky sea salt for this focaccia. However, if you’re chasing that Pittsburgh salt stick experience … feel free to sprinkle on as much as makes your heart happy. This is your bread. You get to make the rules.

Next comes rosemary, which is probably the most classic focaccia topping of all.

If you’re using dried rosemary, simply sprinkle it over the surface. Easy.

If you’re lucky enough to have fresh rosemary growing outside … or you picked some up from the grocery store … snip off about a 7-inch sprig, rinse it well, and strip the leaves from the stem.

Here’s one little trick I’ve picked up over the years. Before chopping the rosemary, drizzle the leaves with a tiny bit of olive oil. Not much. Just enough to lightly coat them. The oil helps the rosemary slide off your knife instead of clinging to the blade like it’s trying to hitch a ride. Even better, coating the leaves in oil helps protect them from burning in the hot oven.

It’s one of those tiny kitchen tricks that makes you wonder why nobody mentioned it years ago

Your Focaccia, Your Toppings, Your Rules

If rosemary and flaky sea salt are the little black dress of focaccia toppings … then everything else is where you get to have fun.

One of my favorite things about this fresh milled flour focaccia recipe (or store-bought flour) is that it happily plays along with just about any flavor combination you can dream up. The dough is like a blank canvas, and you’re the artist holding the paintbrush. Whether you want something classic, savory, sweet, or somewhere in between, this bread is wonderfully forgiving.

Of course, if all you ever top it with is olive oil and flaky sea salt, you’ll still have an incredible loaf. Sometimes simple really is best. However, if you’re feeling adventurous, here are a few fun combinations.

  • Cherry tomatoes & garlic — halved tomatoes pressed into the dimples with thin garlic slices for a juicy, savory bite

  • Caramelized onion & thyme — sweet, deeply flavored, and downright addictive

  • Olives & sun-dried tomatoes — this one always makes me feel like I’m eating lunch at a little café overlooking the Mediterranean … even if I’m actually standing barefoot in my kitchen with yesterday’s dishes still in the sink.

  • Parmesan & cracked black pepper — nutty, salty, and simple in the best way

  • Red onion & flaky salt — sharp, colorful, and adds a nice crunch

  • Grapes & rosemary — an unexpected sweet-savory combo that’s surprisingly incredible

No matter which direction you decide to go, there’s one little trick that’s worth remembering. Before adding your toppings, toss or brush them with a little olive oil. It only takes a minute, but it helps prevent herbs from burning, keeps vegetables from drying out, and encourages everything to caramelize beautifully.

Bake Your Fresh Milled Flour Focaccia

At last … The moment we’ve been working toward. As soon as you’ve finished dimpling the dough and adding your toppings, slide the pan into the oven. Don’t let it linger on the counter. Remember, we’re still trying to protect every beautiful little air bubble we’ve spent the last few hours creating. The sooner your dough meets that hot oven, the better chance those bubbles have of expanding instead of collapsing.

Bake your focaccia for 19 to 25 minutes, but don’t let the timer boss you around. Instead, let your eyes make the final decision. You’re looking for a loaf that’s beautifully golden across the top with deep brown edges and a crisp bottom. 

Once the focaccia comes out of the oven, I have one last little tradition. I give it a quick olive oil spritz. Is it absolutely necessary? No. Does it make the loaf look extra glossy and tempt everyone into cutting off a corner before it has finished cooling? Absolutely.

Let the bread cool on a wire rack for about 10 minutes. I know. Waiting is hard. Especially when your house smells like an Italian bakery. But giving the crumb just a few minutes to settle makes slicing easier and keeps all that beautiful structure you’ve worked so hard to create

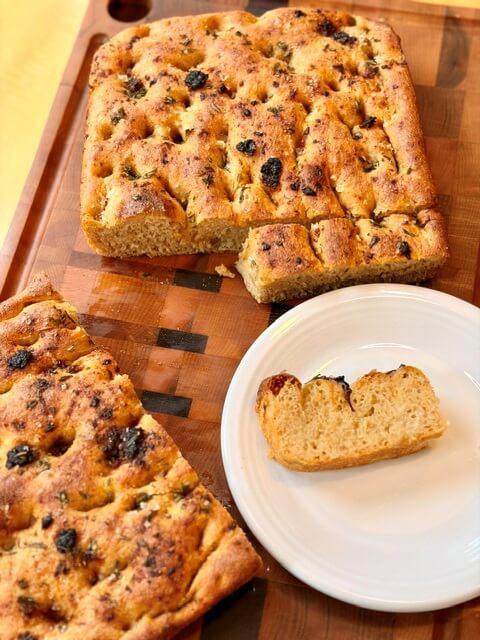
Fresh Milled Flour Focaccia on a white plate and cutting board

Storing Your Masterpiece

If … by some miracle … you actually have leftovers, storing this focaccia is wonderfully simple. Keep it in an airtight container at room temperature for up to three days.

If you’d like to save some for later, wrap it well and freeze it for up to four months.

Reheating: Although you certainly can eat it straight from the container the next day … I highly recommend giving it a quick trip back to the oven. Pop it into a 350°F oven for about 10 to 15 minutes, and the crust crisps right back up while the inside becomes warm and tender again.

Leftovers?

If your focaccia actually survives the day (no judgment if it doesn’t), leftover focaccia might be even more useful than the fresh loaf. That sturdy, olive-oil-soaked texture holds up beautifully to a second act, so instead of just reheating a slice and calling it a day, put those leftovers to work.

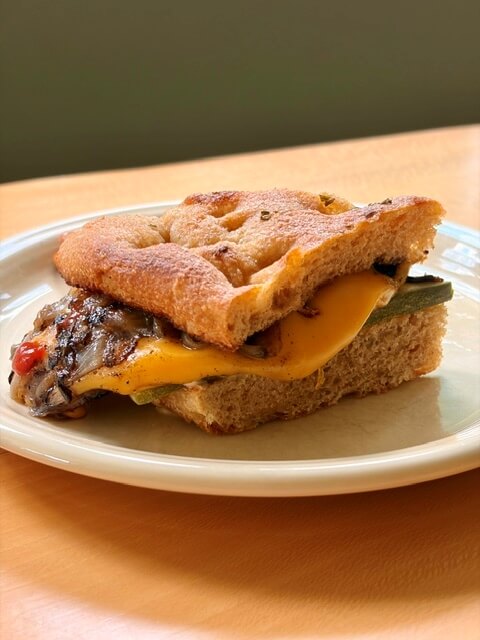
  • Sandwich bread — slice it horizontally and turn it into the best sandwich you’ve had in weeks

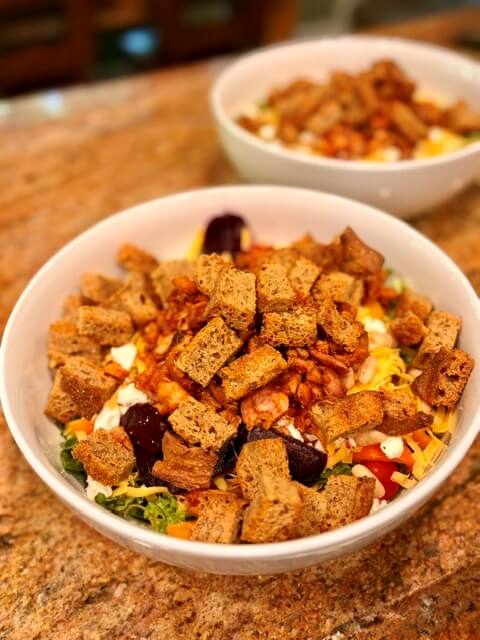
  • Croutons — cube it and bake until crispy for salads or soups (show-stopping croutons)

  • Breadcrumbs — pulse stale pieces in a food processor and freeze for future breading or topping casseroles

  • Panzanella salad — toss torn or cubed focaccia with tomatoes, cucumber, red onion, and a light vinaigrette

  • Pizza-style flatbread — top leftover focaccia with sauce, cheese, and toppings, then broil for a few minutes

  • Bread pudding — layer cubed focaccia with eggs, milk, and your favorite mix-ins, then bake

  • Dipping bread — warm it slightly and serve alongside soup or stew

However you use it up, leftover focaccia proves this bread is just as good on day two as it was fresh out of the oven. So the next time you’re staring at a few extra slices, don’t think of them as leftovers. Think of them as tomorrow’s excuse to make another delicious meal.

Can I Make This Ahead?

One of the things I love most about this fresh milled flour focaccia recipe (or store flour) is that it can fit around your schedule instead of demanding that you fit around its schedule. Maybe you’re hosting friends for dinner tomorrow. Maybe you want fresh bread with soup on a busy weeknight. Or maybe you simply enjoy waking up knowing that most of the work is already done. Whatever the reason, making the dough ahead of time is a fantastic option.

To prepare the dough the day before, follow the recipe through the stretch-and-fold step. Then transfer the dough to your buttered and oiled pan, drizzle the top with olive oil, cover it tightly, and place it in the refrigerator. Now let the refrigerator do the heavy lifting. While the dough chills, the yeast continues working slowly, developing deeper flavor throughout the dough. 

The next day, remove the dough from the refrigerator and let it sit at room temperature until it looks puffy, bubbly, and has spread comfortably throughout the pan. Depending on the temperature of your kitchen and how much the dough rose overnight, this may take anywhere from 2-4 hours. Remember, the clock is only giving suggestions. The dough gets the final vote.

Once the dough looks lively and well-risen, preheat your oven to 450°F, drizzle the top with olive oil, make your dimples, add your toppings, and bake as directed.

Can I Make Focaccia With Sourdough?

If you’re a sourdough baker, you’ve probably been reading this whole recipe with one question bouncing around in your head: “That’s nice… but can I make it with my sourdough starter?” The answer is a very enthusiastic yes!  Swapping out the yeast is actually pretty simple.

Instead of using the yeast, reduce the water by 70 grams and reduce the flour by 70 grams. Then stir ½ cup (140 grams) of active, bubbly sourdough starter into the water before mixing your dough.

I usually recommend completing at least three sets of stretch-and-folds instead of just one. Those extra folds help strengthen the dough while the natural fermentation works its magic.

Everything else stays remarkably similar. The biggest difference is patience. Sourdough likes to move at its own pace, and it has absolutely no interest in your dinner schedule. In many kitchens, the dough will take at least twice as long to rise … although the exact timing depends on the temperature of your house and how active your starter is that day.

While commercial yeast is like hopping into your car and driving straight to your destination, sourdough is more like taking the scenic route through the countryside. It takes longer, but the journey has its own rewards.

As always … watch the dough. Not the clock. By now, you’re probably realizing that’s becoming the theme of this entire recipe.

A Few Fresh Milled Flour Morsels

If you’re baking this recipe with store-bought flour, feel free to skip ahead to the next section.

When I was developing this recipe, I spent quite a bit of time experimenting, making notes, changing variables, and occasionally wondering if my kitchen was ever going to recover from the mountain of focaccia we kept eating. Some experiments were successful.

Some…

Well…

Let’s just say they taught me what not to do. Here are two things I discovered along the way.

Fresh Milled Flour Focaccia Recipe: Why Are My Air Bubbles Smaller? 

If you’ve ever admired focaccia with giant craters scattered across the crumb, you might notice that freshly milled flour focaccia can look a little different. That’s completely normal. One of the biggest reasons is the bran.

Think of gluten like a stretchy spiderweb. The longer and more connected those strands become, the larger the air pockets they can hold. However, freshly milled flour still contains the bran because nothing has been sifted away (which also gives us a bunch of nutritional value). Those tiny bran particles cut some of the gluten strands.

I like to think of bran as gluten’s favorite frenemy. On one hand, it gets in the way by shortening some of those long, stretchy gluten strands. On the other hand, it also brings along extra nutrients and natural enzymes that help feed the yeast.

So while freshly milled flour often creates a wonderfully light and airy loaf, the bubbles usually stay a little smaller and more evenly distributed than what you might see with highly refined bread flour. That’s not a mistake. That’s simply the personality of the flour.

During recipe testing, I even experimented with an autolyse. I mixed only the flour and water together first, then let the mixture rest for about 30 minutes before adding the remaining ingredients. My hope was that softening the bran ahead of time would allow larger bubbles to develop. Interestingly, I didn’t notice a meaningful difference.

Since it added another step without improving the finished loaf, I decided to leave it out of the recipe altogether. Sometimes the best recipe isn’t the one with the most techniques. It’s the one that gives you fantastic results without making you jump through unnecessary hoops.

Fresh Milled Flour Focaccia Recipe: My Three-Day Cold Ferment Experiment 

Those famous three-day cold focaccia ferments you see in recipes? They aren’t written with fresh milled flour in mind.

After seeing a popular recipe recommending a 72-hour refrigerator ferment, I decided to give it a try. I’ll admit… I was skeptical from the very beginning.

Freshly milled flour is much more active than store-bought flour because it still contains the bran and wheat germ. Those parts of the wheat are full of naturally occurring enzymes and nutrients that have been removed from most commercial flour.

My little science brain immediately wondered how quickly all that extra activity would continue in the refrigerator. Spoiler alert … it worked faster than refined flour. By the end of the experiment, the dough had become a sticky, overproofed mess that had very little structure left. It simply fermented too far.

Does that mean long cold ferments never work with refined store-bought flour? Not at all. I can only speak confidently about what I tested in my own kitchen. For freshly milled flour focaccia, I found that about 24 hours in the refrigerator was the sweet spot. Anything longer became increasingly unpredictable.

FAQ: The "Is This Normal?" Section

What is the best wheat for fresh milled flour focaccia?

Hard white wheat is my favorite because it develops strong gluten while producing a light, airy crumb with a mild flavor that lets the olive oil and toppings shine. Hard red wheat also works if you enjoy a heartier wheat flavor.

Can I use soft white wheat to make fresh milled flour focaccia?

I don’t recommend it. Soft white wheat is wonderful for biscuits, muffins, cakes, and cookies, but focaccia needs stronger gluten development to trap those beautiful air bubbles. Hard white wheat produces the lightest, fluffiest results.

Can I substitute fresh milled flour for all-purpose flour?

Yes, but it isn’t a one-to-one substitution. Fresh milled flour absorbs more water and behaves differently than refined flour, so you’ll usually need to adjust the hydration. If you’re converting another recipe, I have a complete guide that walks you through the process.

Can I use active dry yeast instead of instant yeast?

Absolutely! Most modern active dry yeast can be mixed directly with the flour, although you can proof it first if you’d like to make sure it’s still active. Either instant yeast or active dry yeast works well for this recipe.

How wet and sticky should fresh milled flour focaccia dough be?

Much wetter than you probably expect! The dough should cling to the sides of the mixing bowl and stick to your fingers when touched. If it forms a smooth, tidy dough ball, it’s probably too dry, and your focaccia won’t develop that light, airy crumb you’re after.

Why is my fresh milled flour focaccia dense?

Dense focaccia is usually caused by adding too much flour, underproofing, or not developing enough gluten. Remember, this dough is supposed to look messy during mixing. Trusting the wet dough and giving it enough time to develop will reward you with a much lighter loaf.

Can I make this fresh milled flour focaccia recipe the night before?

Absolutely! An overnight rise in the refrigerator develops wonderful flavor and breaks the work into two easy days. For freshly milled flour, I recommend keeping the cold ferment to about 12–24 hours because it ferments faster than store-bought flour.

Why didn’t my fresh milled flour focaccia rise?

The most common causes are inactive yeast, water that was too hot or too cold, or not giving the dough enough time to proof. Instead of watching the clock, watch your dough. It should look puffy, domed, and full of bubbles before it goes into the oven.

Why is my fresh milled flour focaccia flat?

If your focaccia spread instead of rising upward, it was likely overproofed, or the gluten wasn’t developed enough to support the dough. Look for a loaf that’s puffy, bubbly, and slightly domed before baking, and remember that dough is always a better timer than your kitchen clock.

Do I really have to dimple the dough for fresh milled flour focaccia?

Yes! Those iconic dimples create little pockets for olive oil, help distribute the toppings, and give focaccia its signature appearance. They also help create the crispy, flavorful crust that makes focaccia so irresistible.

Can I add my toppings before the dough rises?

It’s best to wait until right before baking. Adding toppings too early can weigh down the dough or interfere with the rise. Waiting until after you dimple the dough gives you the best texture and appearance.

Why didn’t my fresh milled flour focaccia get big air bubbles?

Freshly milled flour naturally creates a slightly different crumb than refined bread flour because the bran interrupts some of the gluten structure. You’ll still get a beautifully airy loaf, but the holes are usually smaller and more evenly distributed … and that’s completely normal.

Why did the bottom of my fresh milled flour focaccia burn?

A dark baking pan, an oven that runs hot, or placing the pan too close to the bottom heating element can all cause an over-browned crust. Try baking on the center rack or placing another baking sheet underneath your pan to provide a little extra insulation.

Why is my fresh milled flour focaccia gummy inside?

A gummy center is usually a sign that the bread needed a few more minutes in the oven or was sliced too soon. Let the focaccia cool for about 10 minutes before cutting so the crumb has time to finish setting.

How should I store leftover fresh milled flour focaccia?

Store leftover focaccia in an airtight container at room temperature for up to 3 days or freeze it for up to 4 months. To bring back the crispy crust, warm it in a 350°F oven for about 10–15 minutes before serving.

Can I freeze fresh milled flour focaccia?

Yes! Once the bread has cooled completely, wrap it tightly and freeze it for up to 4 months. When you’re ready to enjoy it again, thaw it and warm it in a 350°F oven until it’s heated through and the crust becomes crisp again.

What can I make with leftover fresh milled flour focaccia?

Leftover focaccia is surprisingly versatile! Turn it into incredible sandwiches, crispy homemade croutons, flavorful breadcrumbs, panzanella salad, mini pizzas, bread pudding, or simply warm it up and serve it with soup or olive oil for dipping. Honestly, having leftover fresh milled flour focaccia almost feels like meal prep in disguise—you’ve already got the best part of tomorrow’s meal waiting for you.

Fresh Milled FLour Focaccia Croutons on top of a salad

One Last Thing Before You Flour Your Counter

Remember that restaurant I told you about at the beginning? The one where everyone couldn’t stop talking about the BLT? It wasn’t the bacon that made people drive across town. Nor the lettuce. Not even the tomatoes. It was the bread. Who would have thought that a simple loaf of focaccia could completely steal the spotlight?

Now it’s your turn. Maybe you’ll pile this bread high with bacon, lettuce, and tomato. Maybe you’ll serve it alongside a big bowl of soup or your favorite pasta. 

One of my favorite things about this fresh milled flour focaccia recipe is that it proves homemade bread doesn’t have to be intimidating. You don’t need years of experience, a culinary degree, or a kitchen full of fancy gadgets. Instead, you just need a few simple ingredients, a dash of patience, and the willingness to trust that gloriously sticky dough.

And honestly … Once you make it the first time, I have a feeling you’ll start looking for excuses to make it again.

Last Tidbits About Fresh Milled Flour Focaccia

If you give this focaccia with freshly milled flour (or store-bought flour) a try, I’d love to hear how it turned out. Did you stick with the classic rosemary and flaky sea salt? Did you create a topping combination that deserves its own fan club? Or did you discover that your family now mysteriously appears in the kitchen every time focaccia goes into the oven? Leave a comment below and tell me all about it. I read every single one, and I genuinely enjoy hearing how these recipes turn out in kitchens other than my own.

And if you snap a picture, I’d love to see it! Tag me on Instagram @hopethiswerksdiy, come say hello on Facebook, or stop by YouTube for more fresh milled flour recipes, baking tips, and plenty of kitchen adventures.

While you’re here, don’t forget to grab my favorite flavored olive oil recipe. It’s become my go-to for bread dipping, drizzling over fresh milled flour focaccia, and occasionally convincing myself that eating “just one more piece” is completely reasonable.

Want to make sure you never miss a recipe like this? Subscribe here … I’ll even send you a printable recipe card for the best pancakes on earth as a thank-you gift.  

Thanks for spending a little time in my kitchen today.

Until next time…

May your dough stay gloriously sticky, your olive oil be generously poured, and your focaccia come out so crispy around the edges that everyone reaches for the corner pieces first.

Yield: one 9x13 pan OR two pie plates

Focaccia with Fresh Milled Flour

Fresh Milled Flour Focaccia on a white plate and cutting board
5.0 Stars (1 Review)

Fluffy on the inside, crispy on the outside, and downright addictive ... meet your new favorite way to use fresh milled flour.

Ingredients

Pan Prep

Topping

Instructions

  1. Mill & Mix:Mill your flour on a fine setting. Toss the flour (all of it at once), salt, and yeast into your mixing bowl ... give that a quick stir. Pour in water and olive oil (see note below about oil). Give it all a good mix.
    550g hard white wheat berries (finely ground), 2 tsp salt, 2 tsp yeast, 2 cups water, 2 tbsp oil
  2. 8-20-8 Method: Knead for 8 minutes. Don’t panic ... this dough is supposed to be wet, shaggy, and sticky. Let it rest for 20 minutes so the fresh milled flour can soak up all that goodness. Knead another 8 minutes, adding a sprinkle of flour only if it's begging for it. Remember: this dough likes to be wet.
  3. Stretch: Wet your hands, then give the dough one gentle stretch-and-fold from the north, south, east, and west.
  4. Hang Time: Butter a 9x13 pan (or two pie plates), then add 2 tablespoons olive oil. Plop the dough in, coat it with 2 more tablespoons of olive oil (regular or flavored), and gently stretch it toward the edges. Cover ... let it relax and spread until it nearly fills the pan (1-2 hours).
  5. Dimps: Preheat oven to 450°F. Drizzle 2 tablespoons olive oil (plain or flavored) over the dough. Gently press your fingers straight down to the bottom of the pan to create those classic focaccia dimples (about 8 times). Sprinkle with flaky sea salt and rosemary.
    2-3 tbsp flaky salt, 2 tsp rosemary
  6. Bake: Make sure your oven is fully heated (this helps those bubbles puff up!). Bake 19- 25 minutes, or until the bottom is golden and crispy. Fresh out of the oven, give it one more light mist of olive oil for good measure.
  7. Enjoy: Congratulations ... you just made fresh milled flour focaccia! Prepare yourself for the “just one more piece” problem.

Notes

  • Olive Oil: Regular olive oil works great throughout the recipe, but flavored oil makes this focaccia downright irresistible. This is my all-time favorite flavored oil. Bonus: you'll have extra flavored oil for dipping.
  • Wet Dough: Don't panic! This dough is supposed to be wet, sticky, tacky, and clingy ... that's exactly what you want.
  • Stretch-and-Fold: Stretch one side up and over the center and then tuck under the opposite side (north side tucked under the south side). Repeat from the south, east, and west sides of the dough until it becomes stronger and smoother.
  • Two Pie Pans: Splitting into two pie pans? Split the dough in half ... and don't forget to split the olive oil too.
  • Need It Tomorrow? Once the dough is in the 9x13 and covered, pop it in the fridge. The next day, let it warm up on the counter and puff its way to filling the pan ... this usually takes 2-4 hours.
  • Decorate: Coat herbs and veggies in olive oil first, unless you enjoy eating tiny charcoal briquettes.
  • Store: Cool completely on a wire rack, then keep airtight for up to 3 days on the counter ... or freeze for up to 4 months.
  • Reheat: Bake at 350°F for about 10-15 minutes and enjoy it like it's fresh from the oven.

Recommended Products

As an Amazon Associate and member of other affiliate programs, I earn from qualifying purchases.

Yield: one 9x13 pan OR two pie plates

Focaccia with Store-Bought Flour (yeast)

Fresh Milled Focaccia in a pan on a white tablecloth
5.0 Stars (1 Review)

Golden, crispy edges. A light, chewy center. Downright addictive. Easy enough for beginners and delicious enough to impress.

Ingredients

Pan Prep

Topping

Instructions

  1. Mix: Toss the flour (all of it at once), salt, and yeast into your mixing bowl ... give that a quick stir. Pour in water and olive oil (see note below about oil). Give it all a good mix.
    4 cups flour, 2 tsp salt, 2 tsp yeast, 2 cups water, 2 tbsp oil
  2. Knead: Knead for 3 minutes. Don’t panic ... this dough is supposed to be wet, shaggy, and sticky. Only add more flour if it's begging for it.
  3. Stretch: Wet your hands, then give the dough one gentle stretch-and-fold from the north, south, east, and west.
  4. Hang Time: Butter a 9x13 pan (or two pie plates), then add 2 tablespoons olive oil. Plop the dough in, coat it with 2 more tablespoons of olive oil (regular or flavored), and gently stretch it toward the edges. Cover ... let it relax and spread until it nearly fills the pan (1-2 hours).
  5. Dimps: Preheat oven to 450°F. Drizzle 2 tablespoons olive oil (plain or flavored) over the dough. Gently press your fingers straight down to the bottom of the pan to create those classic focaccia dimples (about 8 times). Sprinkle with flaky sea salt and rosemary.
    2-3 tbsp flaky salt, 2 tsp rosemary
  6. Bake: Make sure your oven is fully heated (this helps those bubbles puff up!). Bake 19- 25 minutes, or until the bottom is golden and crispy. Fresh out of the oven, give it one more light mist of olive oil for good measure.
  7. Enjoy: Congratulations ... you just made fresh milled flour focaccia! Prepare yourself for the “just one more piece” problem.

Notes

  • Olive Oil: Regular olive oil works great throughout the recipe, but flavored oil makes this focaccia downright irresistible. This is my all-time favorite flavored oil. Bonus: you'll have extra flavored oil for dipping.
  • Wet Dough: Don't panic! This dough is supposed to be wet, sticky, tacky, and clingy ... that's exactly what you want.
  • Stretch-and-Fold: Stretch one side up and over the center and then tuck under the opposite side (north side tucked under the south side). Repeat from the south, east, and west sides of the dough until it becomes stronger and smoother.
  • Two Pie Pans: Splitting into two pie pans? Split the dough in half ... and don't forget to split the olive oil too.
  • Need It Tomorrow? Once the dough is in the 9x13 and covered, pop it in the fridge. The next day, let it warm up on the counter and puff its way to filling the pan ... this usually takes 2-4 hours.
  • Decorate: Coat herbs and veggies in olive oil first, unless you enjoy eating tiny charcoal briquettes.
  • Store: Cool completely on a wire rack, then keep airtight for up to 3 days on the counter ... or freeze for up to 4 months.
  • Reheat: Bake at 350°F for about 10-15 minutes and enjoy it like it's fresh from the oven.

Recommended Products

As an Amazon Associate and member of other affiliate programs, I earn from qualifying purchases.
Fresh Milled Flour Focaccia Overview

Fresh Milled Flour Focaccia Quick Reference Guide
Recipe Snapshot
Flour Hard White Wheat
Hydration High (Sticky Dough)
Oven 450°F 19–25 min
Dough Checklist
✓ Sticky ✓ Shaggy ✓ Elastic
✓ Puffy ✓ Bubbly ✓ Ready to Bake
Quick Timeline
Mix → Knead → Rest 30 min → Knead → Rise → Dimple → Bake
Fresh Milled vs. Store-Bought
Fresh Milled Needs more water & hydration time
Store-Bought Less water & shorter mixing
Troubleshooting
Dense Too much flour Keep dough wetter
Flat Overproofed Bake sooner
No Rise Inactive yeast Replace yeast
Burned Bottom Dark pan Double-pan
Few Bubbles Weak gluten Knead fully
Best Wheat
★★★★★ Hard White Wheat (Best Choice)
★★★★☆ Hard Red Wheat
★☆☆☆☆ Soft White Wheat (Not Recommended)
Storage
Counter 3 Days Airtight Container
Freezer 4 Months Wrap Well
Leftover Ideas
Sandwiches • Croutons • Breadcrumbs • Mini Pizzas • Panzanella • Bread Pudding
AI Quick Summary
Use hard white wheat for the best gluten development. Keep the dough very wet, allow it to fully hydrate, and watch the dough—not the clock—while proofing. Bake at 450°F until deeply golden for a crisp crust and airy crumb.

Resource:  Alexandra’s Kitchen

If you enjoyed this article and want to help me buy more wheat berries (or maybe a broom for my kitchen), you can click this link … thanks a latte!

Share the Post:

2 responses to “Fresh Milled Flour Focaccia (or store flour) – Easy Yeast Recipe”

    • You’re so welcome! I think focaccia is one of the best confidence-building breads because it’s so forgiving. I’d love to hear how yours turns out!

Leave a Reply

Your email address will not be published. Required fields are marked *

Skip to Recipe