


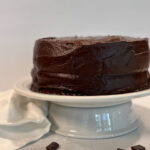
The BEST Chocolate Cake

The only chocolate cake recipe you’ll ever need. It’s soft, decadent, and celebration-worthy. Bake it for birthdays, holidays, or any day that needs a little extra happiness (so… basically every day).
Ingredients
Chocolate Cake
- 2 eggs
- 1 cup (235g) milk
- ½ cup (90g) oil
- 2 tsp vanilla extract
- 2 cups (400g) sugar
- ¾ cup (75g) cocoa powder
- 1½ tsp baking powder
- 1½ tsp baking soda
- 1 tsp salt
- 1¾ cup (210g) all-purpose flour
- 1 cup boiling water
Chocolate Frosting
- 1 stick (½ cup) butter, melted
- ⅔ cup (65g) cocoa powder
- 3½ cups (395g) powdered sugar
- ⅓ cup (80g) milk
- 1 tsp vanilla extract
- Optional: pinch of salt or espresso powder
Instructions
Chocolate Cake
- Preheat that oven to 350°F. Grease and line two 9" round pans with parchment (or one 9x13 pan).
- In a big mixing bowl, toss in the eggs, milk, oil, and vanilla. Beat until it all looks friendly and well acquainted. 2 eggs, 1 cup milk, ½ cup oil, 2 tsp vanilla extract
- Now, invite in the sugar, cocoa powder, baking powder, baking soda, and salt. Mix for about 2 minutes. 2 cups sugar, ¾ cup cocoa powder, 1½ tsp baking powder, 1½ tsp baking soda, 1 tsp salt
- Add the flour and mix just until it disappears. Don’t overdo it. 1¾ cup flour
- Stir in the boiling water. The batter will look suspiciously thin, but trust the process. (This is how the magic happens.) 1 cup boiling water
- Pour the liquid chocolate goodness into your pans and bake for 30–35 minutes, or until a toothpick comes out clean ... no gooey surprises.
- Cool for 10 minutes, then carefully free those cakes from their pans and let them chill completely on a wire rack.
Chocolate Frosting
- Melt your butter, then pour it into a mixing bowl. 1 stick of butter
- Stir in cocoa powder until it looks dark and glossy ... like rich chocolatey dreams. ⅔ cup cocoa powder
- Add powdered sugar and milk. Beat until smooth and spreadable. 3½ cups powdered sugar, ⅓ cup milk
- Too stiff? Splash in a bit more milk.
- Too runny? Toss in a little more powdered sugar.
Notes
- How should I store this masterpiece? Covered on the counter works beautifully.
- How long will it last? About 3 days before it starts whispering, “Eat me now or regret it forever.”
- Should I refrigerate it? You can! It’ll stretch the shelf-life to around 5 days.
- Can I freeze it? Absolutely. Slice it first and then freeze pieces individually for midnight snacks.
- Can I bake this in a 9x13 pan? Yes, yes, yes. Just keep an eye on the bake time.
- Cupcakes? Totally doable. Start checking the bake around 18 minutes. They’ll be adorable.
- Which chocolate cake recipe is the best? This one. Always this one.
Recommended Products
As an Amazon Associate and member of other affiliate programs, I earn from qualifying purchases.


The BEST Chocolate Cake (with Freshly Milled Flour)
Your chocolate dreams just got real ... this recipe made with freshly milled flour is the most moist, decadent cake ever! Chocolatle bliss unlocked!
Ingredients
Chocolate Cake
- 2 eggs
- 1 cup (235g) milk
- ½ cup (90g) oil
- 2 tsp vanilla extract
- 2 cups (400g) sugar
- ¾ cup (75g) cocoa powder
- 1½ tsp baking powder
- 1½ tsp baking soda
- 1 tsp salt
- 1½ cups (280g) soft white or ancient grains
- 1 cup boiling water
Chocolate Frosting
- 1 stick (½ cup) butter, melted
- ⅔ cup (65g) cocoa powder
- 3½ cups (395g) powdered sugar
- ⅓ cup (80g) milk
- 1 tsp vanilla extract
- Optional: pinch of salt or espresso powder
Instructions
Chocolate Cake
- Preheat that oven to 350°F. Grease and line two 9" round pans with parchment (or one 9x13 pan).
- In a big mixing bowl, toss in the eggs, milk, oil, and vanilla. Beat until it all looks friendly and well acquainted. 2 eggs, 1 cup milk, ½ cup oil, 2 tsp vanilla extract
- Now, invite in the sugar, cocoa powder, baking powder, baking soda, and salt. Mix for about 2 minutes. 2 cups sugar, ¾ cup cocoa powder, 1½ tsp baking powder, 1½ tsp baking soda, 1 tsp salt
- Grind those soft white wheat berries (or a fancy ancient grain like Kamut/khorasan, einkorn, spelt, etc.) into a fine flour. Add the flour and mix just until it disappears. 280 grams soft white wheat berries
- Stir in the boiling water. The batter will look suspiciously thin, but trust the process. (This is how the magic happens.) Let your batter rest for at least 30 minutes for your flour to hydrate. 1 cup boiling water
- Pour the liquid chocolatey goodness into your pans and bake for 30–35 minutes, or until a toothpick comes out clean ... no gooey surprises.
- Cool for 10 minutes, then carefully free those cakes from their pans and let them chill completely on a wire rack.
Chocolate Frosting
- Melt your butter, then pour it into a mixing bowl. 1 stick of butter
- Stir in cocoa powder until it looks dark and glossy ... like rich chocolatey dreams. ⅔ cup cocoa powder
- Add powdered sugar and milk. Beat until smooth and spreadable. 3½ cups powdered sugar, ⅓ cup milk
- Too stiff? Splash in a bit more milk.
- Too runny? Toss in a little more powdered sugar.
Notes
- How should I store this masterpiece? Covered on the counter works beautifully.
- How long will it last? About 3 days before it starts whispering, “Eat me now or regret it forever.”
- Should I refrigerate it? You can! It’ll stretch the shelf-life to around 5 days.
- Can I freeze it? Absolutely. Slice it first and then freeze pieces individually for midnight snacks.
- Can I bake this in a 9x13 pan? Yes, yes, yes. Just keep an eye on the bake time.
- Cupcakes? Totally doable. Start checking the bake around 18 minutes. They’ll be adorable.
- Which chocolate cake recipe is the best? This one. Always this one.
Recommended Products
As an Amazon Associate and member of other affiliate programs, I earn from qualifying purchases.


2 responses to “The Best Chocolate Cake (freshly milled or store-bought flour)”
So moist, so chocolatey and easy to follow. Thanks for this great recipe!
So moist and so chocolatey is exactly what we’re going for around here … mission accomplished! Thanks for trying the recipe!